Volkswagen Polo Owners Manual: Headlight range control, instrument and switch lighting
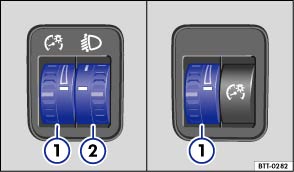
Fig. 69 Next to the steering wheel: control for instrument and switch lighting ① and headlight range control ②
 First read and observe the introductory information
and safety warnings
First read and observe the introductory information
and safety warnings
① Instrument and switch lighting
When the headlights are switched on, the brightness of the instruments and switch lighting can be regulated to suit your requirements by turning the control .
② Headlight range control
Depending on what level it is set to, the headlight range control adjusts the position of the light cones in the headlights according to the load that the vehicle is carrying. This gives the driver the best visibility possible and means that oncoming traffic will not be dazzled .
The headlights can only be adjusted when the dipped beam headlights are switched on.
| To adjust, turn the control to: | |
|---|---|
| Setting | Vehicle load levela) |
| – | Front seats occupied and luggage compartment empty. |
| 1 | All seats occupied and luggage compartment empty. |
| 2 | All seats occupied and luggage compartment fully loaded. Towing a trailer with a low drawbar load. |
| 3 | Only the driver seat occupied and luggage compartment fully loaded. Towing a trailer with maximum drawbar load. |
Dynamic headlight range control
There is no control ② for headlight range if the vehicle has dynamic headlight control. The headlight range is automatically adapted to suit the vehicle load level as soon as the headlights are switched on .
Instrument cluster lighting
When the headlights are switched on, the brightness of the instrument cluster lighting can be regulated to suit your requirements by turning the control .
In vehicles with daytime running lights, the instrument cluster lighting switches off automatically in darkness and at other times, e.g. when driving through a tunnel. This should prompt the driver to switch on the dipped beam manually so that the vehicle's rear lights are also switched on , .

 WARNING
- The light cone should always be adjusted to the load level of the vehicle to ensure that other road users are not dazzled.
WARNING
- Go to a qualified workshop to have the headlight range control checked immediately.
a) If you have different loads, you can select a position between the settings.
 Masking or switching over headlights for driving abroad (travel mode)
First read and observe the introductory information
and safety warnings
If you have to drive a right-hand drive vehicle in a left-hand drive country,
or vice versa, the asymmetric dipped beam hea ...
 Interior and reading lights
First read and observe the introductory information
and safety warnings
Button or position
Function
Switches off the interior lights.
...
Other materials:
Empty Refrigerant Circuit
–
Remove malfunctioning component.
–
Remove the A/C compressor.
–
Remove oil drain plug from A/C compressor.
Note
To speed up refrigerant oil drai ...
Protecting
Caution
Missing protection leads to the electrical system
damage.
Note
All threaded connections must be tightened to the specified
torque.
...
Contact Housings and Connectors, Repair Information
Note
Observe general notes for repairs on the vehicle electrical
system. Refer to
→ Chapter „Vehicle Electrical System, General Repair
Information“.
Allocation of crimp contacts with correct fit ...
