Volkswagen Polo Service & Repair Manual: Antenna Wires, Replacing
| A new repair concept has been developed for repairing
antenna wires. Refer to
→ Chapter „Antenna Wires, Repairing“. |
| Instead of a complete antenna wire, connecting wires of
different lengths and various adapter leads are now available as
replacement parts. |
| Replacement parts can be found in Parts Catalog. |
| These original replacement parts are suitable for all
antenna wires and wire cross sections to be replaced. |
| Connector housing for antenna wires can be obtained as a
replacement part only in one color, but can be used for all
antenna connector colors. |
| The replacement of individual antenna connectors during
repair work is not intended. |
| The wires are appropriate for use on all VW models with
equipped antenna wiring cross-sections. |
| All adapter leads and connecting wires are suitable for
various transmission and reception signals. |
| This repair concept can also be used for testing or as an
aftermarket solution. |
|
|
|
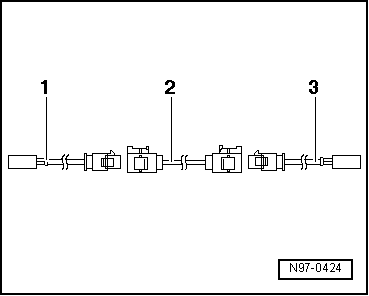
| Assembly Overview of Antenna Wire |
| Example: antenna wire from the radio to the antenna is
faulty. The following wires are required for repair |
| 1 - |
Adapter lead for connection to radio. Length approximately
30 cm. |
| 2 - |
Connecting wire, available in various lengths. |
| 3 - |
Adapter lead, for connection to antenna. Length
approximately 30 cm. |
| Installation of a New Antenna Wire |
 Note Note
| Depending on vehicle equipment, make sure that the total
length of antenna wire can be divided into partial lengths by
control modules for antenna selection, control modules for
traffic monitoring or antenna amplifier. Only the defective
sections need to be replaced. |
| – |
Separate the connectors of the faulty antenna wiring from
their components. |
| – |
Determine the path of the faulty antenna wire in the vehicle
and measure the total length of antenna wire to be replaced. |
|
|
|
| The entire length of the antenna wire consists of the length
of the required adapter leads -1-
and -3- as well as the connecting
wire -2-. |
| – |
Subtract 60 cm from the total length calculation for an
antenna wire to provide for the required length of connecting
wire -2- to be installed. |
| – |
Obtain the required adapter cables -1
and 3- as well as the calculated length of connecting
wire -2- as genuine replacement
part according to the Parts Catalog. |
| – |
Cut the connectors off of the faulty antenna wiring. |
| Leave the rest of the defective antenna wire in the vehicle. |
| – |
Connect adapter leads -1- and
-3- to modules in vehicle. |
| – |
Route and secure connecting wire -2-
in the immediate vicinity of the series-installed wire routing. |
Note
| Antenna wires must not be kinked or excessively bent! The
bending radius must not be less than 50 mm. |
| – |
Connect the connecting wire with the adapter leads. |
| – |
Perform a function test. |
|
|
|
Unshielded two-strand wiring -1-
and -2- with a cross section of
0.35 mm2 or 0.5 mm2
can be used as CAN bus wiring.
The color ...
Special tools and workshop equipment
required
Crimping Pliers - .35-2.5mm -VAS1978/1A-
Wiring Harness Repair - Cri ...
Other materials:
Acoustic and optical ParkPilot signals at the rear of the vehicle
Fig. 121 ParkPilot screen display (colour)
Fig. 122 ParkPilot screen display (monochrome)
First read and observe the introductory information
and safety warnings
Key for displays
and
Meaning
Ⓐ
Scanned area ...
Checklist
Never carry out any work on the engine or in the engine compartment
if you are not familiar with the requisite procedures and general safety requirements,
or if you only have access to incorrect operating equipment, service fluids,
and unsuitable tools . The work should be carried ou ...
Contaminants Removed from Refrigerant Circuit
The reservoir/receiver/dryer or dryer bag/cartridge should
not be replaced under the following conditions.
After an accident when there is no damage on the
reservoir/receiver/dryer.
The repair was done quickl ...
© 2016-2026 Copyright www.vwpolo.net


 CAN Bus Wires, Repairing
 Wires with Cross Section up to 0.35 mm 2,
Repairing
Wires with Cross Section up to 0.35 mm 2,
Repairing