Volkswagen Polo Service & Repair Manual: Wires with Cross Section up to 0.35 mm 2,
Repairing
| Special tools and workshop equipment
required |
| Crimping Pliers - .35-2.5mm -VAS1978/1A- |
| Wiring Harness Repair - Crimping Head - .35-2.5mm
-VAS1978/1-1- |
| When repairing wires with a cross-section up to 0.35 mm2,
new contacts must always be crimped on using the Crimping Pliers
- JPT -VAS1978/9A- or the Wiring Harness Repair - Crimping Plier
- Base Tool -VAS1978/1-2- with the Wiring Harness Repair Set -
Crimping Head - JPT -VAS1978/9-1- installed. Due to the low
current strengths of these wires in the micro- to milli- range,
contacts crimped on incorrectly lead to continuity resistances
and cause malfunctions or failure of the respective system. The
most frequent applications of these contacts are |
| By using the Crimping Pliers - JPT -VAS1978/9A- or the
Wiring Harness Repair - Crimping Plier - Base Tool -VAS1978/1-2-
with the Wiring Harness Repair Set - Crimping Head - JPT
-VAS1978/9-1- installed, the correct connection between crimp
contact, wire and single wire seal is guaranteed. The tool is to
be used only for the purpose described. |
 Note Note
| Contacts in a normal and a gold-plated version are crimped
onto repair wires. The same version of the contact that was
installed at the factory must always be used for repairs. |
| Crimping A New Contact with Single Wire Seal |
| – |
Insert the Wiring Harness Repair Set - Crimping Head - JPT
-VAS1978/9-1- into the Wiring Harness Repair - Crimping Plier -
Base Tool -VAS1978/1-2-. Refer to
→ Chapter „Crimping Pliers - .35-2.5mm -VAS1978/1A-“. |
|
|
|
| – |
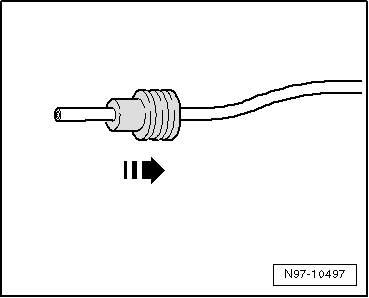
Place the single wire seal onto the repair wire. |
Note
| When doing this, the smaller diameter of single wire seal
must be facing in the direction of the contact to be crimped on. |
|
|
|
| – |
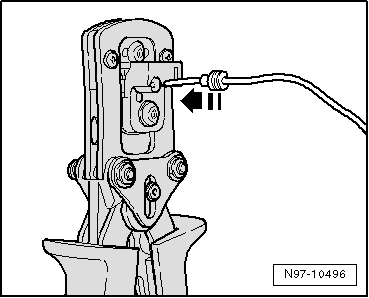
Open crimp pliers and place the repair wire end into
stripping slot of crimp pliers. |
|
|
|
| – |
Close crimp pliers completely. |
| – |
Open crimp pliers again and remove the stripped wire end. |
|
|
|
| – |
Slide single wire seal in direction of stripped wire end
until it rests flush with the wire insulation. |
|
|
|
| – |
Place new crimp contact into mount on crimp pliers. |
|
|
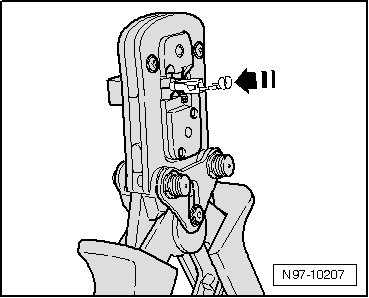
|
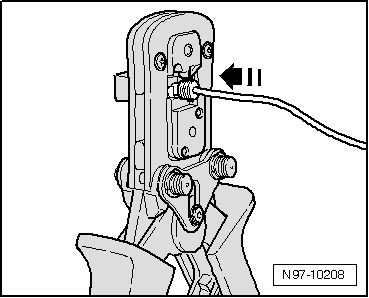
| – |
Insert the stripped wire end with positioned single wire
seal into crimp contact until it makes contact on “wire stop”. |
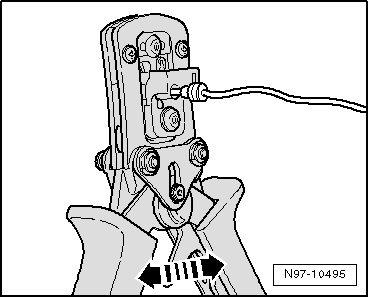
| – |
Crimp the contact, wire and single wire seal by closing
crimp pliers completely. |
| – |
Open crimp pliers again and remove the finished crimped-on
contact. |
|
|
|
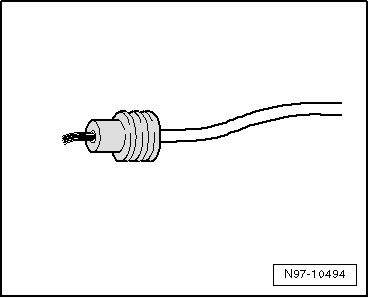
| A correctly performed crimp is distinguished by a clean
compression of wire and single wire seal in the contact and has
an impression on the rear side which identifies that the crimp
was performed by a professional using the correct tool. |
|
|

|
A new repair concept has been developed for repairing
antenna wires. Refer to
→ Chapter „Antenna Wires, Repairing“.
Instead of a ...
Repair point with single crimp connection
–
Free up wire intended for repair (approximately 20 cm to
both sides of repair point).
...
© 2016-2026 Copyright www.vwpolo.net

 Antenna Wires, Replacing
 Wire Break with Single Repair Point