Volkswagen Polo Owners Manual: Opening and closing the electric panorama sliding/tilting glass roof
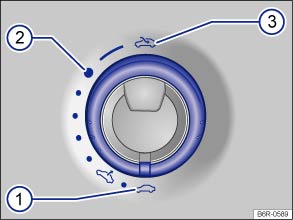
Fig. 33 In the roof: turn the switch to open and close
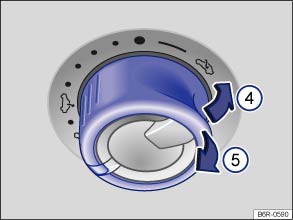
Fig. 34 In the headliner: push the switch to tilt and pull the switch to close
 First read and observe the introductory information
and safety warnings
First read and observe the introductory information
and safety warnings
The rotary switch must be in the basic position â‘ before the electric panorama sliding/tilting glass roof can be tilted.
| Function | and | Action |
|---|---|---|
| Opening sliding roof completely | ③ | Turn the switch past the position ② and hold down until the glass roof has reached the required position. |
| Moving sliding roof to convenience position | ② | Turn the switch to the required position. |
| Set an intermediate position. | ② to ①| |
| Closing sliding roof completely | â‘ | |
| Tilting the tilting roof completely | â‘Ł | Push the switch back briefly. |
| Stopping the one-touch function | ④ or ⑤ | Press or pull the switch again briefly. |
| Closing fully | ⑤ | Pull the switch back briefly. |
The electric panorama sliding/tilting roof will work only when the ignition has been switched on. The electric panorama sliding/tilting glass roof can be operated for a short time after the ignition has been switched off, provided the driver door or the front passenger door is not opened.
If the closing procedure has been started, it will be interrupted as soon as the ignition is switched off and the switch for the electric panorama sliding and tilting glass roof is activated.
If it is not possible to close the electric panorama sliding/tilting glass roof electrically you will have to close it manually. You will not be able to close the electric panorama sliding/tilting glass roof manually without first removing some vehicle components. Go to a qualified workshop.
Sliding blind
Use the handle at the front near the roof opening to move the sliding blind to the required position.

The convenience position allows sufficient air supply together with low wind noise.
 Introduction
This chapter contains information on the following subjects:
→ Opening and closing the electric panorama sliding/tilting glass roof
→ Electric panorama sliding/tilting glass roof â ...
 Electric panorama sliding/tilting glass roof – function
First read and observe the introductory information
and safety warnings
Convenience opening and closing
The electric panorama sliding/tilting glass roof can be opened and closed from
the outside ...
Other materials:
Infrared Dryer -VAS6875
Definition:
Infrared Dryer -VAS6875-
Product Description:
The infrared dryer is used to dry paste, filler, base paint,
top coats and clear coats on vertical and horizontal surfaces
using two ...
Contact Housings, Repairing Wire Terminals
Note
For technical reasons, the contact housing for the wire
terminals can be supplied only with the contacts pushed in.
These contacts can be removed at every other contact housing ...
Coolant Fan Control Module -J293
Note
Available in different construction styles, some installed
on coolant fan -arrows-.
This control module switches on and off the A/C clutch and
therefore the A/C compressor. It switche ...
