Volkswagen Polo Owners Manual: Fitting the removable ball coupling
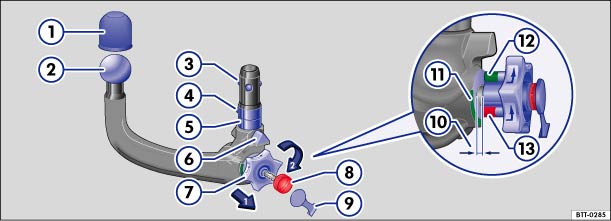
Fig. 91 Overview: removable ball coupling
 First read and observe the introductory information
and safety warnings
First read and observe the introductory information
and safety warnings
The removable ball coupling is located under the luggage compartment floor with the vehicle toolkit.
Key for :
 Cap
Cap  Ball coupling
  Retaining balls
  Catch for locking mechanism
  Shank
Shank  Centring device
  Handwheel
  Keys
Keys  Cover
Cover  Gap (pre-tensioned ball coupling)
  Green marking on the ball coupling
 Green marking on handwheel
  Red marking on handwheel
Step 1: Preparations
- Before using the ball coupling for the first time, make a note of the number stamped on the key. This can be used if you need to acquire a replacement key.
- Remove the cover underneath the rear bumper. To do this, reach into the recess and pull the cover down and off. Stow the cover in the vehicle.
- Remove the sealing plug from the ball coupling mounting.
- Move the trailer socket down from the right-hand side and then as far up as possible to the left. This gives you access to the ball coupling mounting.
- Check to ensure that the mounting, handwheel , shank ⑤ and retaining balls ③ of the ball coupling are all clean and not damaged . Clean as necessary.
Step 2: Setting the ball coupling to the "ready" position
The ball coupling cannot be fitted properly unless the spring mechanism inside the ball joint is in the ready position.
- Take the ball coupling in your left hand.
- Remove the cover from the lock and insert the key ⑧ into the lock.
- Turn the key clockwise.
- Use your right hand to pull out the handwheel ⑦ in the direction of arrow 1 and keep it in this position .
- Turn the handwheel ⑦ in the direction of arrow 2 until it engages. The ball coupling is now in the ready position. The red marking ⑬ on the handwheel must point towards the green marking ⑪ on the ball coupling. The handwheel is clearly visible in front of the ball coupling. The distance between the two is approximately 4 mm ⑩.
- Check to see whether all retaining balls ③ can be pressed fully into the ball coupling mount ⑤.
Step 3: Attaching the pre-tensioned ball coupling to the vehicle
Do not touch the handwheel once the ball coupling has been pre-tensioned. When engaged, the handwheel will spring back to its original position and could cause injury .
- Guide the pre-tensioned ball coupling into the mounting pipe from below.
- Push the ball coupling firmly upwards until it engages. Both of the centring devices must engage in the insertion point on the vehicle.
- The handwheel has now returned to its original position. There is no longer a gap between the handwheel and the ball coupling.
- Turn the key ⑧ anticlockwise in the handwheel and remove it.
- If the setting is correct, you will not be able to turn the handwheel or pull it out.
- Put the cover ⑨ over the lock and place the key in the vehicle toolkit.
Step 4: Safety check
Check to see whether the ball coupling is attached properly:
- The green marking on the handwheel must point towards the green marking ⑪ on the ball coupling.
- The handwheel must rest on the ball coupling and there may be no gap between them.
- Shake the ball coupling or pull it down with some force. It must sit firmly in the mounting .
- The lock must be locked and the key removed. The cover must be fitted over the lock in the handwheel.

 WARNING
- Only use the ball coupling when it is fitted properly.
- If the smallest diameter on the ball coupling is smaller than 49 mm, do not use the towing bracket.
- The ball coupling is heavy. When checking whether it is secure, the ball coupling could fall off and cause injuries.
- Do not touch the handwheel once the ball coupling has been pre-tensioned. When the ball coupling is pressed into the mounting, the handwheel will spring back to its original position.
- If the ball coupling will not fit properly, the towing bracket should be checked by a qualified workshop.
- Do not use the towing bracket if the ball coupling does not engage properly or if you are unable to set it to the "ready" position.
- Do not use the towing bracket if you are unable to remove the key from the handwheel once the ball coupling has been mounted. This means that ball coupling is not locked properly.
- Always fasten the ball coupling securely in the luggage compartment once it has been removed.

 NOTICE
- The mounting on the vehicle, handwheel, shank and ball coupling retaining balls must all be clean and undamaged. Otherwise you may not be able to lock the ball coupling securely.
- Do not aim a high-pressure hose or steam cleaner directly at the ball coupling mounting. This could wash the grease required for lubrication out of the mounting.
 Technical requirements
First read and observe the introductory information
and safety warnings
If the vehicle is supplied with a factory-fitted towing bracket
it will already have the necessary technical modifications ...
 Removing the ball coupling
First read and observe the introductory information
and safety warnings
Unhitch the trailer .
Remove the cover from the lock on the handwheel.
Insert the key ⑧ into the lock and ...
Other materials:
Driving with an open tailgate
First read and observe the introductory information
and safety warnings
Driving with an open tailgate is particularly dangerous. Ensure that the open
tailgate and any objects are secured properly, and take appropriate measures to
reduce the quantity of toxic exhaust fumes entering the vehicle ...
Engine oil specification
First read and observe the introductory information
and safety warningsThe engine oil used must correspond exactly to specifications.
The correct engine oil is important for the function and service life of the
engine. A special high quality multigrade oil has been filled at the factory and
t ...
Aquaplus Touch-Up System
Definition:
Touch-Up Additive for Aquaplus -LVM 030 000 A2-
Edition 06/2011
Product Description
The touch-up Additive for Aquaplus is especially suited for
painting Aquaplus ...
