Volkswagen Polo Owners Manual: Various securing systems
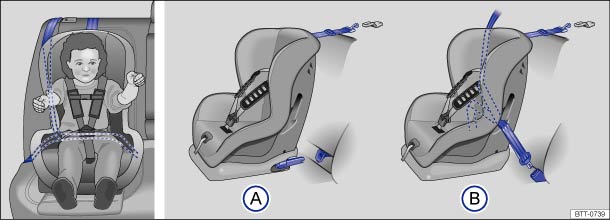
Fig. 62 On the rear seats: figure Ⓐ illustrates the main securing points for the child restraint system on the lower retaining rings and top tether. Figure Ⓑ shows how to secure a child restraint system using the vehicle's seat belt
 First read and observe the introductory information
and safety warnings
First read and observe the introductory information
and safety warnings
Always secure child seats properly, safely and in accordance with the instructions from the child seat manufacturer.
The fitted child seat must sit close to the vehicle seat and must not be able to move or tip more than 2.5 cm.
Child seats that are intended to be secured using the top tether must be secured in the vehicle using the top tether . Attach the top tether only to the retaining rings fitted for this purpose. Always pull the top tether tightly so that the child seat is secure and fits closely to the seat.
Country-specific securing systems
Variants of the attachment system :
 ISOFIX retaining rings and top tether,
including in Europe and .
ISOFIX retaining rings and top tether,
including in Europe and .  Three-point automatic seat belt and top
tether .
Three-point automatic seat belt and top
tether .
The systems include the securing point for the child restraint system with a top tether and the lower anchoring points on the seat.
 Checklist
Transporting children in the vehicle :
Comply with any country-specific legal regulations.
Volkswagen recommends that children under
12 years of age are always transported on the rear sea ...
 Using a child seat on the front passenger seat
Fig. 63 On the sun visor on the passenger
side: airbag sticker
First read and observe the introductory information
and safety warnings
Not all countries allow you to transport children on the f ...
Other materials:
Taper
Taper is caused by slightly offsetting the tread and/or the
belt by a few tenths of a millimeter from the geometric center
of the tire. Taper cannot be recognized visually nor can it be
measured with workshop equipment.
...
Wheel, Mounting, Audi Assembly Instructions
Vehicles with Tire Pressure Monitoring Sensor.
If wheels are changed (for example, change from summer to
winter tires), wheel electronics send data as soon as speed of
new wheels exceeds 25 km/h (15.53 mph). The control module
automatica ...
Using the vehicle in other countries and continents
First read and observe the introductory information
and safety warningsThe vehicle has been manufactured specifically for a particular
country and complies with the registration regulations that applied in that country
at the time of vehicle production.
If the vehicle is to be sold in anothe ...
