Volkswagen Polo Owners Manual: Opening and closing the bonnet
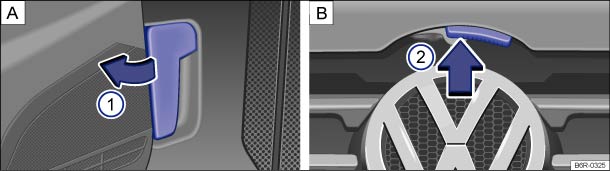
Fig. 134 A: release lever in the footwell on the driver side. B: release lever on the bonnet
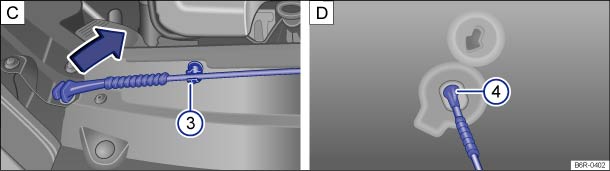
Fig. 135 C: holder for the bonnet stay in the lock carrier. D: bonnet secured with the bonnet stay
 First read and observe the introductory information
and safety warnings
First read and observe the introductory information
and safety warningsOpening the bonnet
- Ensure that the windscreen wiper arms are positioned on the windscreen before opening the bonnet .
- Open driver door and pull the release lever in the direction of the arrow . The bonnet is released from its lock by a spring mechanism .
- Lift the bonnet slightly and at the same time push the release lever in the direction of the arrow to open the bonnet completely.
- Take the bonnet stay out of the holder in the direction of the arrow and hook it into the opening in the bonnet .
Closing the bonnet
- Lift the bonnet slightly .
- Unhook the bonnet stay out of the opening and insert it in the holder .
- Let the bonnet drop into the catches from a height of approximately 30 cm – do not press it down!
If the bonnet is not closed, open it again and close it properly.
The bonnet sits flush with the body parts around it when it is closed properly.

 WARNING
- After closing the bonnet, always check that it is properly secured. The bonnet must be flush with the surrounding body panels.
- If you notice that the bonnet is not closed properly while the vehicle is in motion, stop the vehicle as soon as possible and close the bonnet.
- Therefore the bonnet should only be opened or closed when you are sure that nobody is in its path.

 NOTICE
- The bonnet should only be opened when the wiper arms are flush to the windscreen and when they are switched off in order to avoid damage to the bonnet and the windscreen wiper arms.
- Always fold the windscreen wiper arms back onto the windscreen before driving away.
 Checklist
The following steps should always be carried out in the specified
order before working in the engine compartment :
Park the vehicle on a level and stable surface.
Depress and hold the bra ...
 Engine oil
...
Other materials:
Overview - Tire Pressure Monitoring Sensor with Valve
1 -
Tire Pressure Monitoring Sensor
Supplied complete as a service part
Removing and Installing. Refer to
→ Chapter „Tire Pressure Monitoring Sensor with Valve, Removing and
Installing“.
When battery ...
Refrigerant Circuit with Restrictor and Reservoir
1 -
A/C Compressor
2 -
Condenser
3 -
Restrictor
4 -
Evaporator
5 -
Reservoir with dryer bag
...
Warning lamp
First read and observe the introductory information
and safety warnings
Lit up
Possible cause
Solution
The tailgate is open or not properly closed.
Do not drive on!
Open the tailgate and close it again.
Several warning and ...
