Volkswagen Polo Service & Repair Manual: Evacuating and Charging Valve, High Pressure Side
| Special tools and workshop equipment
required |
| Torque Wrench 1783 - 2-10Nm -VAG1783- with Torque Wrench
1783 - 1/4" Drive Ratchet -VAS6234- |
 WARNING
| There is a danger of ice-up. |
| Refrigerant will leak out if refrigerant circuit is
not discharged. |
| Refrigerant must be extracted before opening
refrigerant circuit. If refrigerant circuit is not
opened within 10 minutes of extraction, pressure may
form in refrigerant circuit due to evaporation. Extract
the refrigerant once more. |
|
| Only valves and connections that are resistant to
refrigerant R134a and refrigerant oil must be installed. |
| Different connections (outer diameter) for high pressure and
low pressure side. |
| Always screw on sealing caps. |
|
|
|
| Refer to
→ Rep. Gr.87 for the vehicle-specific repair manual. |
 Note Note
| Torque Wrench 1783 - 2-10Nm -VAG1783- with Torque Wrench
1783 - 1/4" Drive Ratchet -VAS6234- |
| Use a suitable Refrigerant Sockets -T10364- to loosen the
valve insert. Refer to
→ Fig. „“ Refrigerant Sockets -T10364- for the high pressure/low
pressure side service connection valves in the refrigerant
circuit”“ |
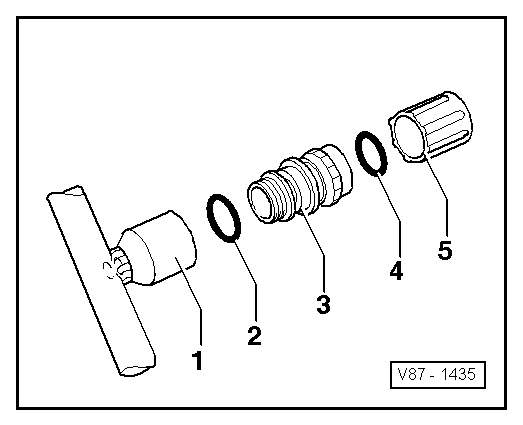
| 1 - |
Socket with external and internal threads |
| 2 - |
O-ring: 10.8 mm; 1.8 mm identification: black or with colors |
| 3 - |
Valve with M12 x 1.5 mm external threads and groove for
O-ring (7 ± 1 Nm) |
| 4 - |
O-ring for the cap: 10.8 mm; 1.8 mm identification: black or
with colors |
|
|
|
Special tools and workshop equipment
required
Torque Wrench 1783 - 2-10Nm -VAG1783- with Torque Wrench
1783 - 1/4" Drive Ratchet -VA ...
Special tools and workshop equipment
required
Torque Wrench 1783 - 2-10Nm -VAG1783- with Torque Wrench
1783 - 1/4" Drive Ratchet -VA ...
Other materials:
Introduction
This chapter contains information on the following subjects:
→ Contents of the breakdown set
→ Preparation
→ Sealing and inflating tyres
→ Test after driving for 10 minutes
You can use the breakdown set (tyre mobility set) to safely seal any tyre
damage cau ...
Changing the bulb in the number plate light
Fig. 186 In the rear bumper:
number plate light
Fig. 187 Number plate light:
removing the bulb holder
First read and observe the introductory
information and safety warnings
A normal flat screwdriver can be used to remove the number plate light .
The actions sh ...
Introduction
This chapter contains information on the following subjects:
→ Indicator lamp
→ Information on changing bulbs
→ Removing and installing the headlights
→ Changing bulbs in the front headlights (halogen H4)
→ Changing bulbs in the front headlights (halo ...
© 2016-2026 Copyright www.vwpolo.net

 Evacuating and Charging Valve with Schrader Valve
 Evacuating and Charging Valve, Low Pressure Side