Volkswagen Polo Service & Repair Manual: Decorative Trims, Replacing, Bonded Decorative Trims
| Special tools and workshop equipment
required |
| Trim Removal Wedge -3409- |
| Wiring Harness Repair Set - Hot Air Blower -VAS1978/14A- |
|
|
|
|
|
- DH 009 100 A2- |
|
|
- LSE 020 100 A3- |
| Decorative Trim, Removing |
 Note
Note
| It is not possible remove the decorative trim without damaging it. |
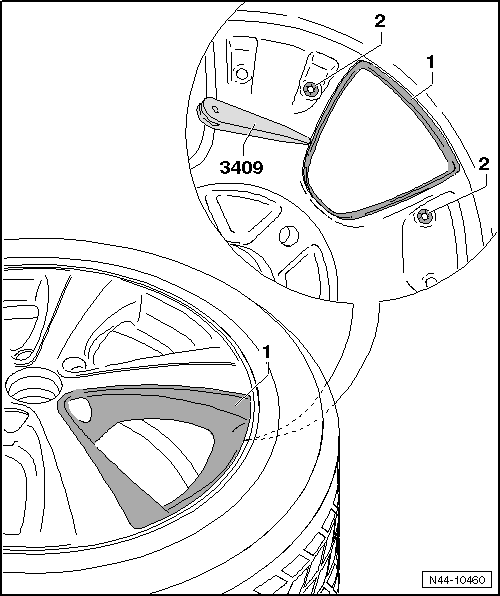
| – |
Loosen the lock washers -2- from the
inside of the light alloy wheel. |
| – |
Warm the decorative trim -1- from the
outside using the Hot Air Blower -VAG1416-. |
 Caution Caution
| Do not overheat tires and light alloy wheels. |
|
| – |
Loosen the decorative trim -1- from the
inside of the light alloy wheel using the Trim Removal Wedge -3409-. |
| – |
Grab under one corner from the outside and pull the decorative trim
-1- off the light alloy wheel. |
Note
| The adhesive points for the PUR label are cut into the light alloy
wheel. |
| The remaining material serves as the adhesive base for the new
decorative trim. |
| The new decorative trim can be installed immediately. |
| Decorative Trim, Installing |
| These light alloy wheels are equipped with replaceable decoration
elements. Note the following when installing. |
| Make sure the adhesion area on the light alloy wheels and decorative
trim are free of dust and grease. |
| Clean the adhesion area with Silicone Remover -LSE 020 100 A3-. |
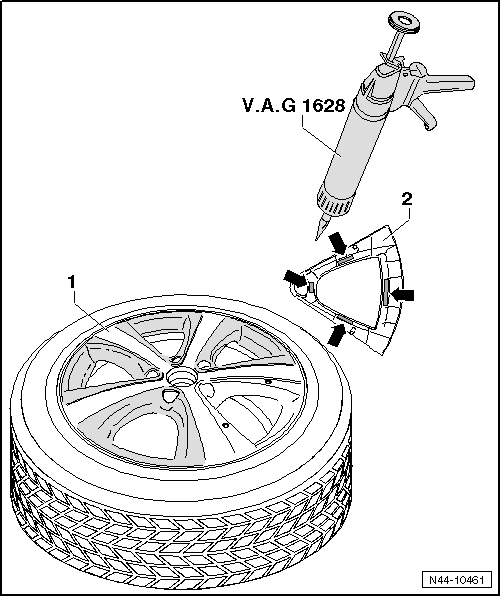
| – |
Apply 1K Window Adhesive -DH 009 100 A2- on the adhesive surfaces
-arrows- using the Cartridge Gun -VAG1628-. |
| Adhesive point: length = approximately 25 mm and diameter =
approximately 10 mm |
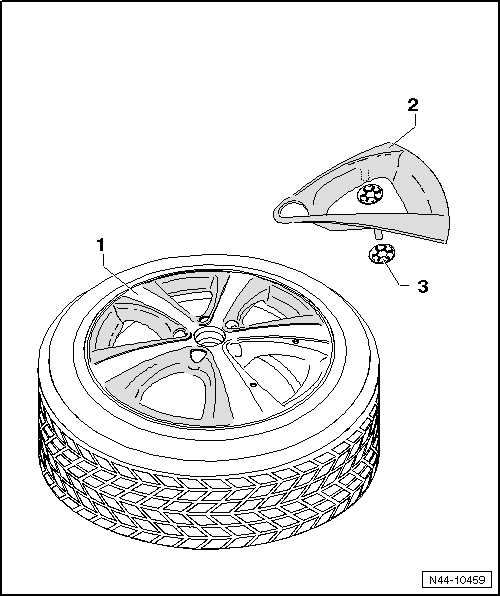
| – |
Press the decorative trim -2- into the
light alloy wheels -1- using firm pressure. |
| – |
Secure the decorative trim -2- to the
inside of the light alloy wheel with lock washers
-3-. |
| Minimum Curing Time: 3 Hours at Room Temperature of Minimum 15 °C
(59 °F). |
 WARNING WARNING
| The light alloy wheel must be balanced again. Refer to
→ Chapter „Vibration“. |
|
These disc wheels are equipped with replaceable decoration
elements. Note the following when installing.
–& ...
Other materials:
Loading the load carrier system
First read and observe the introductory information
and safety warnings
Loads can be attached securely only when the mounts, roof bars and load carrier
system are fitted correctly .
Maximum permissible roof load
The maximum permitted roof load is 75 kg. The roof load limit
refers to the c ...
Siemens Wheel Electronics Tire Pressure Monitoring Sensor, Removing and
Installing
WARNING
If tire sealant was used, then the wheel electronics
on that particular wheel must be replaced.
The Siemens wheel electronics does not have a
microencapsulated ...
Pressure Relief Valve
Caution
Non-approved tools or materials such as leak sealing
additives can cause damage or malfunctions in the
system.
Only use tools and materials approved by the
manufactu ...
© 2016-2026 Copyright www.vwpolo.net


 Decorative Trims, Replacing, Bolted Decorative Trims