Volkswagen Polo Service & Repair Manual: Wiring Eyelets, Repairing
| Special tools and workshop equipment
required |
| Torque Wrench 1331 5-50Nm -VAG1331- |
 Note Note
| Do not use rust remover, contact spray or grease because the
lack of friction will cause the torque to be exceeded when
installing and this will lead to the threaded connection
breaking. |
| The gray sanding pads are for slight contamination and
suitable for "soft surfaces". The red sanding pads are for heavy
contamination and suitable for "hard surfaces". |
 WARNING
| Risk of injury. Follow all Warnings and Safety
Precautions. Refer to
→ Chapter „Warnings and Safety Precautions“. |
|
|
|
|
| – |
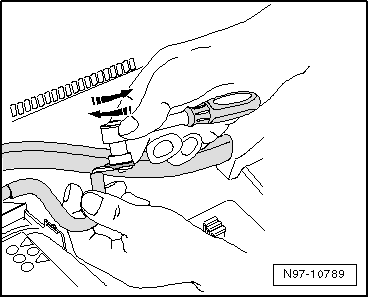
Insert the adapter in the wiring eyelet and sand off the
corrosion and contamination with circular motions. |
| – |
Check the wiring eyelet and sand it again if necessary. |
|
|
|
Special tools and workshop equipment
required
Torque Wrench 1331 5-50Nm -VAG1331-
Note
Do not use r ...
Other materials:
Refrigerant Circuit, Converting R12 to R134a and Servicing
Note
The laws and regulations listed below are applicable in
Germany. Different or additional laws and regulations may apply
in other countries.
Addresses in other countries can be obtained from the
relevant au ...
Replacing Reservoir, No Contaminants, No Loss of Refrigerant
Discharge the refrigerant circuit.
–
Replace the restrictor depending on the vehicle.
–
Remove receiver or accumulator.
–
Remove dirt from receiver or res ...
AGM Battery, Checking
Perform Battery Checks in the Following Sequence:
1.
Visual inspection. Refer to
→ Chapter „Visual Inspection“.
2.
Check the battery using the Battery Tester -VAS6161-. Refer
to
...
© 2016-2026 Copyright www.vwpolo.net

 Caution

 Threaded Connections, Repairing