Volkswagen Polo Service & Repair Manual: Decorative Trims, Replacing, Bonded Decorative Trims
| Special tools and workshop equipment
required |
| Trim Removal Wedge -3409- |
| Wiring Harness Repair Set - Hot Air Blower -VAS1978/14A- |
|
|
|
|
|
- DH 009 100 A2- |
|
|
- LSE 020 100 A3- |
| Decorative Trim, Removing |
 Note
Note
| It is not possible remove the decorative trim without damaging it. |
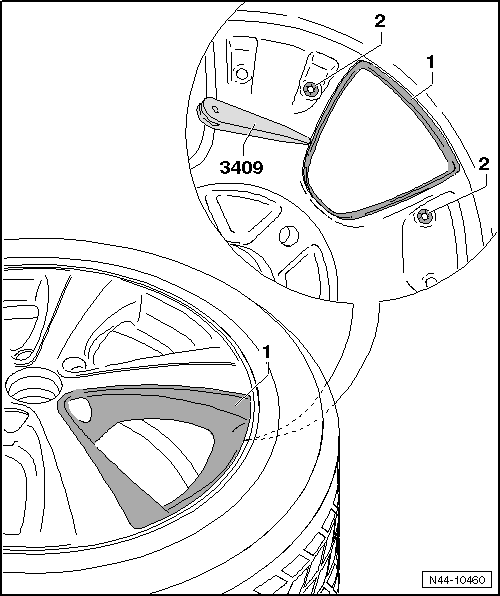
| – |
Loosen the lock washers -2- from the
inside of the light alloy wheel. |
| – |
Warm the decorative trim -1- from the
outside using the Hot Air Blower -VAG1416-. |
 Caution Caution
| Do not overheat tires and light alloy wheels. |
|
| – |
Loosen the decorative trim -1- from the
inside of the light alloy wheel using the Trim Removal Wedge -3409-. |
| – |
Grab under one corner from the outside and pull the decorative trim
-1- off the light alloy wheel. |
Note
| The adhesive points for the PUR label are cut into the light alloy
wheel. |
| The remaining material serves as the adhesive base for the new
decorative trim. |
| The new decorative trim can be installed immediately. |
| Decorative Trim, Installing |
| These light alloy wheels are equipped with replaceable decoration
elements. Note the following when installing. |
| Make sure the adhesion area on the light alloy wheels and decorative
trim are free of dust and grease. |
| Clean the adhesion area with Silicone Remover -LSE 020 100 A3-. |
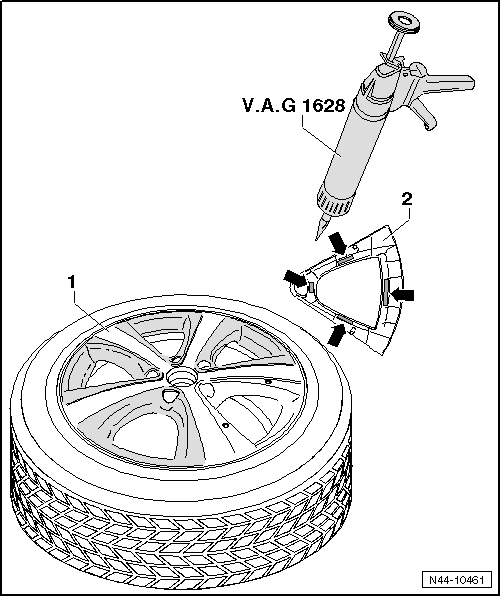
| – |
Apply 1K Window Adhesive -DH 009 100 A2- on the adhesive surfaces
-arrows- using the Cartridge Gun -VAG1628-. |
| Adhesive point: length = approximately 25 mm and diameter =
approximately 10 mm |
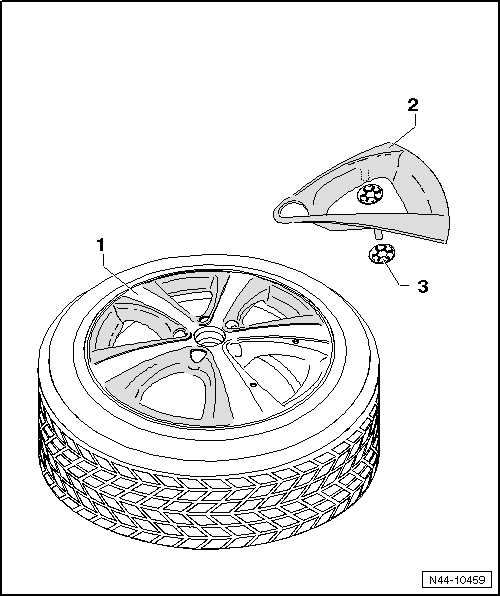
| – |
Press the decorative trim -2- into the
light alloy wheels -1- using firm pressure. |
| – |
Secure the decorative trim -2- to the
inside of the light alloy wheel with lock washers
-3-. |
| Minimum Curing Time: 3 Hours at Room Temperature of Minimum 15 °C
(59 °F). |
 WARNING WARNING
| The light alloy wheel must be balanced again. Refer to
→ Chapter „Vibration“. |
|
These disc wheels are equipped with replaceable decoration
elements. Note the following when installing.
–& ...
Other materials:
Primary Lock
The primary lock is the locking mechanism of an individual
crimp contact in the contact housing.
If necessary, housing securing mechanisms (secondary locks)
must be released or removed using specified tool before
releasing the contacts. ...
Tires and Rims, Matching
If necessary repair flat spots from standing. Refer to
→ Chapter „Flat Spots, Correcting“.
–
Dismount the tire. Refer to
→ Chapter „Tires, Dismounting“.
–
Turn the ...
Introduction
This chapter contains information on the following subjects: → Wheel cover
→ Wheel bolt caps
Additional information and warnings:
Tyre monitoring system
Cleaning and caring for the vehicle exterior
Vehicle toolkit
Changing a wheel
Breakdown set
...
© 2016-2026 Copyright www.vwpolo.net


 Decorative Trims, Replacing, Bolted Decorative Trims