Volkswagen Polo Owners Manual: Changing the bulbs in the tail light cluster
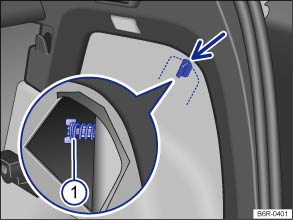
Fig. 184 On the side of the luggage compartment: removing the tail light cluster
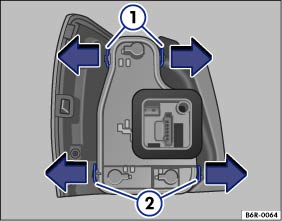
Fig. 185 Tail light cluster: removing the bulb holder
 First read and observe the introductory
information and safety warnings
First read and observe the introductory
information and safety warnings
The steps should only be carried out in the specified order.
Removing the tail light cluster
| 1. | Follow the instructions on the checklist . |
| 2. | Open the tailgate . |
| 3. | Turn the sash fastener (arrow) in the side trim of the luggage compartment to the side. |
| 4. | Hold the sash fastener and pull out the pre-cut cover in the side trim. |
| 5. | Push together the catches on the connector and pull out the connector. |
| 6. | Unscrew the securing bolts by hand . |
| 7. | Carefully pull the tail light cluster to the rear to remove it from the body. Place it on a clean, smooth surface. |
Changing the bulb
| 7. | To release the bulb holder, push the tabs and ② in the direction of the arrows. |
| 8. | Remove the bulb holder from the tail light cluster. |
| 9. | Replace the defective bulb with a new bulb of the same type. |
| 10. | Insert the bulb holder into the tail light cluster. All release tabs must click into place. |
Fitting the tail light cluster
| 11. | Carefully put the tail light cluster into the opening in the body. |
| 12. | Use one hand to hold the tail light cluster in the fitting position while using the other hand to screw the securing bolt firmly back on . |
| 13. | Check that the tail light cluster is positioned correctly and securely. |
| 14. | Connect the connector to the bulb holder until it engages. |
| 15. | Fit the side trim back into the luggage compartment. |
| 16. | Close the tailgate . |
 Changing bulbs in the front bumper
Fig. 182 In the front bumper,
right-hand side: removing the cover and headlight
Fig. 183 In the front bumper,
right-hand side: removing the cover and headlight
First read and observe the intro ...
 Changing the bulb in the number plate light
Fig. 186 In the rear bumper:
number plate light
Fig. 187 Number plate light:
removing the bulb holder
First read and observe the introductory
information and safety warnings
A normal flat s ...
Other materials:
Stone Chip Protection -AKR 311 KD1 05
Definition:
Stone Chip Protection -AKR 311 KD1 05-, black
Edition 04/2009
Product Description
Stone Chip Protection -AKR 311 KD1 05- is a finely atomizing
coating material wi ...
Service interval display
First read and observe the introductory
information and safety warnings
The service display is shown on the instrument cluster or .
Service schedules at Volkswagen are divided into two categories, oil change
service and inspections. The service interval display provides information on
the n ...
General Information
All components of the refrigerant circuit submitted for
quality observation are always to be sealed (use original
sealing caps of original part).
To date, the original parts (compressor, reservoir,
receiver/dryer, evaporator and co ...
