Volkswagen Polo Owners Manual: Changing a wheel
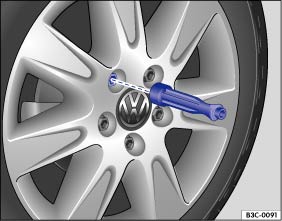
Fig. 170 Changing the wheel: removing the wheel bolts with the screwdriver handle
 First read and observe the introductory
information and safety warnings
First read and observe the introductory
information and safety warnings
Removing the wheel
- Read the checklist .
- Loosen the wheel bolts .
- Jack up the vehicle .
- Using the hexagonal socket in the screwdriver handle , unscrew the loosened wheel bolts, remove and place on a clean surface.
- Remove the wheel.
Fitting the spare wheel or temporary spare wheel
Note any specific tyre running direction .
- Position the spare wheel / temporary spare wheel.
- Screw in all the other wheel bolts in a clockwise direction and use the hexagonal socket in the screwdriver handle to tighten them gently.
- Use the adapter for anti-theft wheel bolts where appropriate.
- Lower the vehicle with the jack.
- Use the box spanner to tighten all the wheel bolts securely in a clockwise direction . Do not tighten the bolts in clockwise or anticlockwise sequence. Tighten them in diagonal sequence.
- Fit the centre cover caps or wheel covers .

 WARNING
- Always keep all wheel bolts and threads in the wheel hubs clean and free from oil and grease. The wheel bolts must be easy to turn and be tightened to the specified torque.
- The hexagonal socket in the screwdriver handle should only be used for turning wheel bolts, not use for loosening or tightening them.
 Checklist
To ensure your own safety and that of your passengers, observe
the following actions in the specified order :
Find a firm and level surface
suitable for lifting the vehicle.
Stop the e ...
 After changing a wheel
First read and observe the introductory
information and safety warnings
Clean the tools as necessary and place them back in the toolbox in the
luggage compartment .
Stow the spare whee ...
Other materials:
Handbrake
Fig. 115 Handbrake between the front seats
First read and observe the introductory information
and safety warnings Applying the handbrake
Lift the handbrake lever up fully.
The handbrake is applied when the indicator lamp
lights up in the instrument cluster
.
Releasing ...
Checking with Restrictor and Reservoir, with Internally Regulated A/C
Compressor
Note
Connecting service station. Refer to
→ Chapter „Connecting Service Station“.
Observe test requirements. Refer to
→ Chapter „Pressures, Checking“.
–
...
Gear-change indicator
First read and observe the introductory information
and safety warnings In some vehicles, the instrument cluster
will show which gear should be selected while the vehicle is in motion to reduce
fuel consumption.
Display
Meaning
The c ...
