Volkswagen Polo Service & Repair Manual: Tires, Dismounting, Wheels without and with Tire Pressure Monitoring System
| If equipped check the tire pressure monitoring sensor with
the vehicle diagnostic tester and if necessary replace. |
 Note Note
| When cleaning disc wheel (rim), the tire pressure monitoring
sensor (if equipped) must not come into contact with water or be
blown with pressurized air. |
| If equipped handle the glued-on wheel trim carefully.
Surface slightly scratched. |
| Replace the damaged rim wheel trim. |
| – |
Place the wheel with tire on the tire dismounting/mounting
machine. |
|
|
|
| – |
Turn the wheel until the tire valve or the tire pressure
monitoring sensor is a minimum of 30° before the mounting head. |
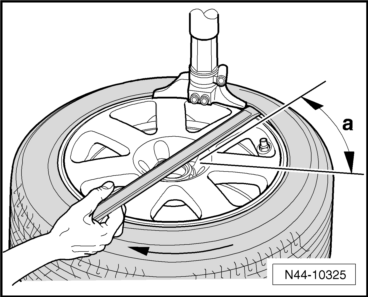
| – |
Pry the upper tire bead with the tire iron over the assembly
carrier. |
| – |
Let tire mounting device run clockwise until upper tire bead
lies completely above the rim flange. |
| – |
Turn the wheel until the tire valve or the tire pressure
monitoring sensor is a minimum of 30° before the mounting head. |
| – |
Pry the lower tire bead with the tire iron over the assembly
carrier. |
| – |
Insert the plastic mounting lever. |
|
|
|
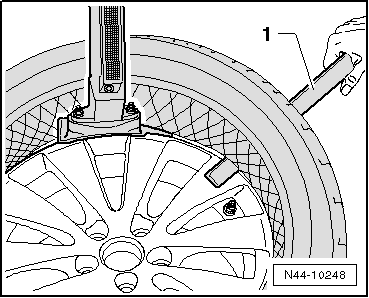
| – |
Hold the lower tire bead from the outside above the wheel
rim flange with the plastic lever -1-.
Let the tire mounting device run clockwise until the tire is
completely off the wheel rim. |
Note
| Check the tire pressure monitoring sensor for loose or
damaged parts. If threaded connections are loose, the union nut,
valve insert, seal, sealing washer and valve cap must be
replaced by new parts from the repair set. Refer to Parts
Catalog. |
| Replace the tire pressure monitoring sensor is damaged.
Refer to
→ Chapter „Tire Pressure Monitoring Sensor with Valve, Removing
and Installing“. |
|
|
|
Only trained personnel can perform the assembly work on
run-flat tires and ultra high performance tires.
If equipped check the tire pressure mo ...
Other materials:
Vehicle-specific weight ratings
First read and observe the introductory information
and safety warnings
All data in the official vehicle documents take precedence over these data. All
data in this manual apply to the basic model. The vehicle data sticker in the service
schedule and the official vehicle documents show which ...
Silicone Remover -LLS MAX 007
Definition:
Silicone Remover -LLS MAX 007-
Edition 10/2008
Product Description
The Silicone Remover -LLS MAX 007- is a water-based,
reduced-solvent cleaning agent that is ric ...
Infrared Dryer -VAS6874
Definition:
Infrared Dryer -VAS6874-
Product Description:
The infrared dryer is used to dry paste, filler, base paint,
top coats and clear coats on vertical surfaces using two clock
timers fo ...
© 2016-2026 Copyright www.vwpolo.net


 Tires, Dismounting, Run-Flat Tires and Ultra High Performance Tires