Volkswagen Polo Owners Manual: Locking and unlocking the vehicle from the outside
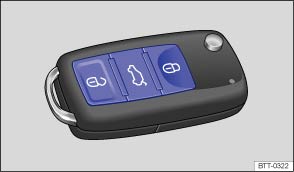
Fig. 23 Buttons on the vehicle key
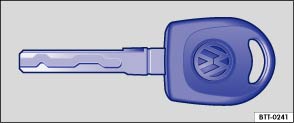
Fig. 24 Mechanical vehicle key
 First read and observe the introductory information
and safety warnings
First read and observe the introductory information
and safety warnings
| Function | Buttons to be used in the vehicle key | Action to be followed with key in the lock cylinder or |
|---|---|---|
| Unlocking the vehicle. | Press the  button.
Press and hold for convenience opening. button.
Press and hold for convenience opening. |
Insert the vehicle key in the driver door lock cylinder and turn anticlockwise. Turn and hold for convenience opening. |
| Locking the vehicle. | Press the  button.
Press and hold for convenience closing. In vehicles with a SAFELOCK mechanism,
press the button once
to lock the vehicle using the SAFELOCK mechanism . Press the
button twice to lock
the vehicle without the SAFELOCK mechanism. button.
Press and hold for convenience closing. In vehicles with a SAFELOCK mechanism,
press the button once
to lock the vehicle using the SAFELOCK mechanism . Press the
button twice to lock
the vehicle without the SAFELOCK mechanism. |
Insert the vehicle key in the driver door lock cylinder and turn clockwise. Turn and hold for convenience closing. |
| Unlocking the tailgate. | Press the  button
. button
. |
Insert the vehicle key in the driver door lock cylinder and turn anticlockwise. |
Please note: depending on the settings made for the central
locking system, all of the doors and the tailgate may only be unlocked once the
button has been pressed twice.
A qualified workshop may be able to program and modify other functions depending on the vehicle equipment level. Volkswagen recommends using a Volkswagen dealership for this purpose.
The vehicle key will lock or unlock the vehicle only when the battery has enough power and the key is located within a few metres of the vehicle.
- When the vehicle is locked, all turn signals will flash once as confirmation.
- When the vehicle is unlocked, all turn signals will flash twice as confirmation.
If the turn signals do not flash as confirmation, at least one of the doors or the tailgate is not closed.
The vehicle cannot be locked using the vehicle key if the driver door is still open. The vehicle will lock again automatically within a few seconds of being unlocked if you do not open one of the doors or the tailgate. This function prevents the vehicle from remaining unlocked if the unlocking button is pressed by mistake.
Convenience opening and closing
- See electric windows – functions .
- See Electric panorama sliding/tilting glass roof – functions .
 Description of the central locking system
First read and observe the introductory information
and safety warnings
The central locking system enables you to lock and unlock all the doors, the
tailgate and tank flap from one central point: ...
 Locking and unlocking the vehicle from the inside
Fig. 25 In the driver door: central locking
button
First read and observe the introductory information
and safety warnings
Press the button :
Unlock ...
Other materials:
Battery, Charging with Battery Charger -VAS5906
WARNING
Risk of injury. Follow all Warnings and Safety
Precautions. Refer to
→ Chapter „Warnings and Safety Precautions“.
WARNING ...
Fender Corrosion Repair Measures, in Wheel Housing Liner Contact Area
Note
The corrosion protection in the fender seam must be applied on all
replacement parts, on which the attached seal is not already present.
The additional corrosion protection seal will prevent “chafe marks”
in the fender wheel housing liner.
...
What happens to vehicle occupants who have not fastened their seat belts
Fig. 47 An unbelted driver is thrown forwards
Fig. 48 The unbelted rear passenger is
thrown forwards, hitting the belted driver
First read and observe the introductory information
and safety warnings
Many people believe that they can brace their weight with their hands in a minor
collisi ...
