Volkswagen Polo Owners Manual: Indicator lamps and fuel gauge
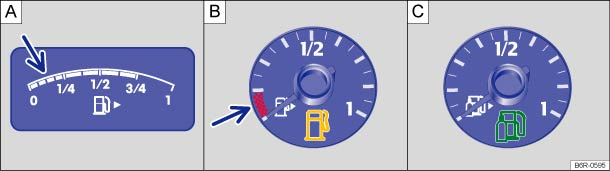
Fig. 129 In the instrument cluster: Variants A and B: fuel gauges for petrol and diesel. Variant C: fuel gauge for autogas
 First read and observe the introductory information
and safety warnings
First read and observe the introductory information
and safety warnings | Lit up | Needle position | Possible cause | Solution |
|---|---|---|---|
 |
Reserve marking or red marking (arrow) | Fuel tank nearly empty. Reserve quantity is being used . |
Fill the tank as soon as possible . |
 |
Vehicle in autogas mode. | ||
 |
Water in fuel in vehicles with a diesel engine. | Switch off the engine and seek expert assistance . |
Several warning and indicator lamps will light up briefly as a functional check when the ignition is switched on. They will switch off after a few seconds.
Autogas engines
The yellow indicator lamp
 lights up when all the fuel except
for the reserve fuel has been used up.
lights up when all the fuel except
for the reserve fuel has been used up.
The green indicator lamp  lights up when the vehicle is in autogas mode.
The green indicator lamp
goes out if the vehicle is changed over to petrol mode automatically or manually.
Things to note: if the vehicle is parked for an extended period directly after refuelling, it is possible that the needle on the autogas gauge will not display exactly the same fuel level shown directly after refuelling when the vehicle is restarted. This does not necessarily indicate a leak in the system.

 WARNING
- When the fuel level is too low, the fuel supply to the engine could be irregular, especially when driving up or down hills and inclines.
- The steering, all driver assist systems and brake support systems will not function if the engine sputters or stops completely due to a lack of fuel or irregular fuel supply.
- Always fill the tank when it is still 1/4 full. This reduces the risk of running out of fuel and breaking down.

 NOTICE
- To avoid damage to your vehicle, always observe the indicator lamps and associated warning texts.
- Do not run the tank empty. Irregular filling periods can cause backfiring and allow unburnt fuel to enter the exhaust system. This could cause damage to the catalytic converter!

The small arrow next to the petrol pump symbol in the display instrument shows you the side of the vehicle on which the tank flap is located.
 Introduction
This chapter contains information on the following subjects:
→ Indicator lamps and fuel gauge
→ Filling the tank with petrol or diesel
→ Refuelling autogas
...
 Filling the tank with petrol or diesel
Fig. 130 In the right-hand side of the
vehicle at the rear: tank flap open
Fig. 131 Open tank flap with tank cap attached
to the holder
First read and observe the introductory information
an ...
Other materials:
Two-Part VHS Hardener and Two-Part VHS Performance Hardener
Definition:
Two-Part VHS Hardener -LHA 009 051 A2-/-LVM 009 051 A5-
Two-Part VHS Hardener, Short -LHA 009 050 A2-
Two-Part VHS Hardener, Long -LHA 009 052 A2-/-LHA 009 052
A3-
...
One-Part Clear Coat
Definition:
One-Part Clear Coat -LLS MAX 010-
Edition 10/2008
Product Description
The One-Part Clear Coat -LLS MAX 010- is a single-compound
product. The raw material base is ...
Controls for the air conditioning system
Fig. 125 In the centre console: air conditioning
controls (manual)
Fig. 126 In the centre console: Climatronic
controls
First read and observe the introductory information
and safety warnings Press the corresponding button to switch
a function on or off. When a function is switched on, ...
