Volkswagen Polo Owners Manual: Changing the bulbs in the tail light cluster
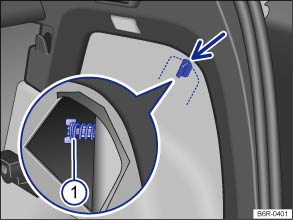
Fig. 184 On the side of the luggage compartment: removing the tail light cluster
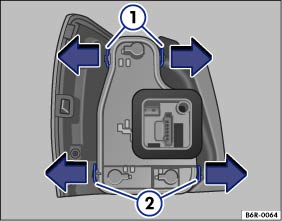
Fig. 185 Tail light cluster: removing the bulb holder
 First read and observe the introductory
information and safety warnings
First read and observe the introductory
information and safety warnings
The steps should only be carried out in the specified order.
Removing the tail light cluster
| 1. | Follow the instructions on the checklist . |
| 2. | Open the tailgate . |
| 3. | Turn the sash fastener (arrow) in the side trim of the luggage compartment to the side. |
| 4. | Hold the sash fastener and pull out the pre-cut cover in the side trim. |
| 5. | Push together the catches on the connector and pull out the connector. |
| 6. | Unscrew the securing bolts by hand . |
| 7. | Carefully pull the tail light cluster to the rear to remove it from the body. Place it on a clean, smooth surface. |
Changing the bulb
| 7. | To release the bulb holder, push the tabs and ② in the direction of the arrows. |
| 8. | Remove the bulb holder from the tail light cluster. |
| 9. | Replace the defective bulb with a new bulb of the same type. |
| 10. | Insert the bulb holder into the tail light cluster. All release tabs must click into place. |
Fitting the tail light cluster
| 11. | Carefully put the tail light cluster into the opening in the body. |
| 12. | Use one hand to hold the tail light cluster in the fitting position while using the other hand to screw the securing bolt firmly back on . |
| 13. | Check that the tail light cluster is positioned correctly and securely. |
| 14. | Connect the connector to the bulb holder until it engages. |
| 15. | Fit the side trim back into the luggage compartment. |
| 16. | Close the tailgate . |
 Changing bulbs in the front bumper
Fig. 182 In the front bumper,
right-hand side: removing the cover and headlight
Fig. 183 In the front bumper,
right-hand side: removing the cover and headlight
First read and observe the intro ...
 Changing the bulb in the number plate light
Fig. 186 In the rear bumper:
number plate light
Fig. 187 Number plate light:
removing the bulb holder
First read and observe the introductory
information and safety warnings
A normal flat s ...
Other materials:
Introduction
This chapter contains information on the following subjects:
→ Preparations for changing a wheel
→ Wheel bolts
→ Lifting the vehicle with the jack
→ Changing a wheel
→ After changing a wheel
Some models are delivered without a factory-fitted jack or ...
One-Part Wash Primer
Definition:
One-Part Wash Primer -LVM 044 007 A2-, light gray
One-Part Wash Primer -LVM 044 171 A2-, dark gray
Edition 08/2013
Product Description
The ...
Front view
Fig. 2 Overview of the front of the
vehicle
Key for :
Rain/light sensor on the mirror base
Windscreen
Windscreen wiper
Bonnet
Bonnet release lever
Headlights
Headlight washer system
Mounting for the front towing eye behind
a cover
Front number plate holder
F ...
