Volkswagen Polo Owners Manual: Changing bulbs in the front headlights (Xenon)
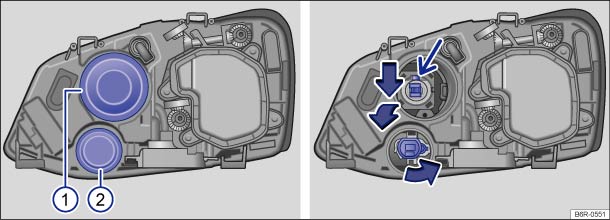
Fig. 181 Rear view of right-hand Xenon headlight: ① cornering light and ② turn signal
 First read and observe the introductory
information and safety warnings
First read and observe the introductory
information and safety warnings
The headlight needs to be removed in order to change a bulb.
| The actions should only be carried out in the specified order: | ||
|---|---|---|
| ① | ② | |
| Dynamic cornering light | Front turn signal | |
| 1. | Follow the instructions on the checklist . | |
| 2. |
Open the bonnet  . .
|
|
| 3. | Pull off rubber cover. | |
| 4. | Push the bulb with the connector down and pull out to the rear of the bulb holder. | Turn the bulb holder anticlockwise as far as it will go and pull it out to the rear along with the bulb. |
| 5. | Remove connector from lamp base. | Pull the bulb straight out of the bulb holder. |
| 6. | Replace the defective bulb with a new bulb of the same type. | |
| 7. | Insert the bulb in the bulb holder with the connector at the bottom and push up. | Insert the bulb holder into the headlight and turn it clockwise as far as it will go. |
| The lug of the bulb (small arrow) must be located in the recess of the bulb holder. | ||
| 8. | Put the rubber cover back on and check if it is fitted securely. | |

The illustrations show the right-hand headlight from the rear. The left-hand headlight is a mirror image of the one shown.
 Changing bulbs in the front headlights (halogen H7)
Fig. 180 Rear view of the
right-hand H7 front headlight: dipped beam ①, turn signal ②, and main beam and
side light ③
First read and observe the introductory
information and safety warn ...
 Changing bulbs in the front bumper
Fig. 182 In the front bumper,
right-hand side: removing the cover and headlight
Fig. 183 In the front bumper,
right-hand side: removing the cover and headlight
First read and observe the intro ...
Other materials:
Primary Lock
The primary lock is the locking mechanism of an individual
crimp contact in the contact housing.
If necessary, housing securing mechanisms (secondary locks)
must be released or removed using specified tool before
releasing the contacts. ...
Introduction
This chapter contains information on the following subjects:
→ Warning lamp
→ Frontal collisions and the laws of physics
→ What happens to vehicle occupants who have not fastened their seat belts
→ Seat belt protection
→ Using seat belts
→ ...
Tire Wear, Outer Shoulder
Improper Use of Air Suspension Height Adjustment
The use of off road levels is only recommended when driving
off road. The permanent use of off road levels on normal roads
can lead to increased tire wear because the changed height
change ...
