Volkswagen Polo Owners Manual: Changing bulbs in the front headlights (halogen H7)
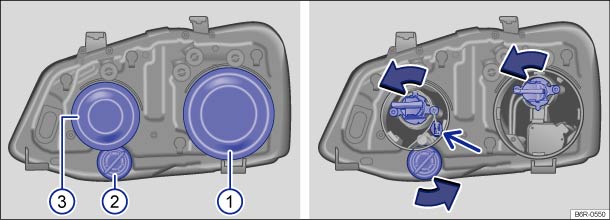
Fig. 180 Rear view of the right-hand H7 front headlight: dipped beam ①, turn signal ②, and main beam and side light ③
 First read and observe the introductory
information and safety warnings
First read and observe the introductory
information and safety warnings
| The actions should only be carried out in the specified order: | ||||
|---|---|---|---|---|
| ① | ② | ③ | ③ | |
| Dipped beam headlights | Front turn signal | Main beam headlights | Side light (small bulb holder) | |
| 1. | Follow the instructions on the checklist . | |||
| 2. |
Open the bonnet  . .
|
|||
| 3. | Remove the headlight as necessary . | |||
| 4. | Pull off rubber cover from back of headlight. | Pull off rubber cover from back of headlight. | ||
| 5. | Turn the bulb holder anticlockwise as far as it will go and pull it out to the rear along with the bulb. | Pull the bulb and bulb holder (thin arrow) out to the rear. | ||
| 6. |
Pull the bulb straight out of the bulb holder. If applicable, push the catch on the bulb holder. |
|||
| 7. | Replace the defective bulb with a new bulb of the same type. | |||
| 8. | Insert the bulb holder into the headlight and turn it clockwise as far as it will go. | Insert the bulb holder into the headlight and push it all the way in. | ||
| 9. | Put the rubber cover on and check if it is fitted securely. | |||
| 10. | Install the headlight as necessary . | |||

The illustrations show the right-hand headlight from the rear. The left-hand headlight is a mirror image of the one shown.
 Changing bulbs in the front headlights (halogen H4)
Fig. 178 Rear view of the
right-hand H4 headlight with plastic covers: ① dipped beam and main beam, ② turn
signal and ③ side light
Fig. 179 Rear view of the
right-hand H4 headlight with ...
 Changing bulbs in the front headlights (Xenon)
Fig. 181 Rear view of right-hand
Xenon headlight: ① cornering light and ② turn signal
First read and observe the introductory
information and safety warnings
The headlight needs to be remov ...
Other materials:
Technical Requirements
The wheel and tire combinations or retrofittings listed in
the individual vehicle tables refer exclusively to original disc
wheels.
Release of wheel/tire combinations or retrofittings with
disc wheels from the accessories trade is ...
Mounting Damage
Bundle broken during tire inflation.
Modern radial car tires are mounted only on safety rims.
These have a hump -1- running along
the shoulders.
1 -
Hump (H2)
...
Safety Precautions
General Safety Precautions
As per VBG 20, German industrial liability insurance
association.
Follow the instructions for the workplace. They should be
displayed in the workplace.
...
