Volkswagen Polo Owners Manual: Changing bulbs in the front headlights (halogen H4)
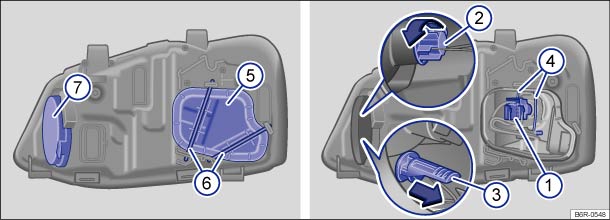
Fig. 178 Rear view of the right-hand H4 headlight with plastic covers: ① dipped beam and main beam, ② turn signal and ③ side light
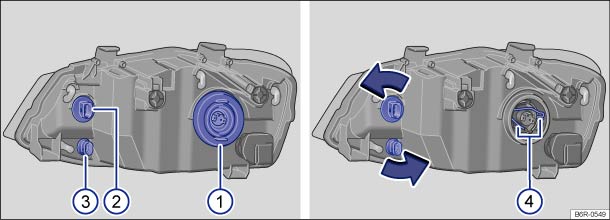
Fig. 179 Rear view of the right-hand H4 headlight with rubber cover: ① dipped beam and main beam, ② turn signal and ③ side light
 First read and observe the introductory
information and safety warnings
First read and observe the introductory
information and safety warnings
The headlight must be removed in order to change a bulb .
Replacing bulbs in H4 headlights with plastic covers
| The actions should only be carried out in the specified order: | |||
|---|---|---|---|
| ① | ② | ③ | |
| Dipped beam and main beam headlights | Front turn signal | Side lights | |
| 1. | Observe and follow the instructions on the checklist . | ||
| 2. |
Open the bonnet  . .
|
||
| 3. | Release clip ⑥ from catches and pull off plastic cover ⑤. | Pull off plastic cover ⑦. | |
| 4. | Push retaining clip ④ downwards and unhook at side. | Turn the bulb holder anticlockwise as far as it will go and pull it out to the rear along with the bulb. | Pull the bulb and bulb holder out to the rear. |
| Pull the bulb and bulb holder out to the rear. | |||
| 5. | Remove bulb from bulb holder. If necessary, press the catch on the bulb holder. | ||
| 6. | Replace the defective bulb with a new bulb of the same type. | ||
| 7. | Insert bulb holder with bulb and fix the retaining clips ④. | Insert the bulb holder into the headlight and turn it clockwise as far as it will go. | Insert the bulb holder into the headlight. |
| 8. | Fit the plastic cover ⑤ and push the clip ⑥ towards the opposite side until it engages. | Put the plastic cover ⑦ on and check that it is fitted securely. | |
| Then check that it sits correctly. | |||
Replacing bulbs in H4 headlights with a rubber cover
| The actions should only be carried out in the specified order: | |||
|---|---|---|---|
| ① | ② | ③ | |
| Dipped beam and main beam headlights | Front turn signal | Side lights | |
| 1. | Observe and follow the instructions on the checklist . | ||
| 2. |
Open the bonnet .
|
||
| 3. | Pull off rubber cover. | Turn the bulb holder anticlockwise as far as it will go and pull it out to the rear along with the bulb. | |
| Push retaining clip ④ downwards and unhook at side. | |||
| Pull the bulb and bulb holder out to the rear. | |||
| 4. | Remove bulb from bulb holder. If necessary, press the catch on the bulb holder. | ||
| 5. | Replace the defective bulb with a new bulb of the same type. | ||
| 6. | Insert bulb holder with bulb and fix the retaining clips ④. | Insert the bulb holder into the headlight and turn it clockwise as far as it will go. | |
| 7. | Put the rubber cover on and check if it is fitted securely. | ||

The illustrations show the right-hand headlight from the rear. The left-hand headlight is a mirror image of the one shown.
 Removing and installing the headlights
Fig. 176 In the engine
compartment: securing bolts for the right headlight
Fig. 177 Guides for installing the
right headlight
First read and observe the introductory
information and safety w ...
 Changing bulbs in the front headlights (halogen H7)
Fig. 180 Rear view of the
right-hand H7 front headlight: dipped beam ①, turn signal ②, and main beam and
side light ③
First read and observe the introductory
information and safety warn ...
Other materials:
Industrial Dirt Remover
Definition:
Industrial Dirt Remover -ABS 600 000 10-
Edition 05/2004
Product Description
Industrial Dirt Remover -ABS 600 000 10- is used to remove
surface rust (metal dust) ...
Folding the seat cushion and backrests on the rear bench seat forwards and backwards
Fig. 82 Rear bench seat: folding the rear
seat cushion forwards
Fig. 83 Rear bench seat: release button
①, red marking ② or release button ③
First read and observe the introductory information
and safety warnings
The rear seat cushions and backrests can be folded forward to extend t ...
General Information
A new repair concept has been developed for repairing washer
system hoses. Various individual hose connectors, adapters,
Ethylene Propylene Diene Methylene (EPDM) rubber hoses and
shrink tubing will be offered as replacement parts.
...
