Volkswagen Polo Service & Repair Manual: Battery Charger -VAS5095A- Device Description
 WARNING
| Risk of injury. Follow all Warnings and Safety
Precautions. Refer to
→ Chapter „Warnings and Safety Precautions“. |
|
 Caution
| In order to prevent damage to the battery or
vehicle, observe battery type descriptions and notes.
Refer to
→ Chapter „Types of Batteries“. |
|
WARNING
| Batteries that have a light yellow visual indicator
do not have to be tested or charged. Jump starting must
not be used! |
| There is a risk of explosion during testing,
charging or jump starting. |
| These batteries must be replaced. |
|
| In this chapter, the base functions of the Battery Charger
-VAS5095A- are described. Refer to Battery Charger -VAS5095A-
Operating Instructions for additional information. |
 Note Note
| The effective charging current cannot be read out on this
unit. The charging current must be measured externally with a
current probe. |
| Pay attention to the Battery Charger -VAS5095A- Operating
Instructions. |
| The Battery Charger -VAS5095A- is designed to charge all 12
V batteries in the VW group. |
| The battery is charged without amperage or voltage surges.
Thereby the on-board electronics will not be affected. It is not
necessary to remove the battery from the vehicle or be
disconnected from the electrical system during charging. |
|
|
|
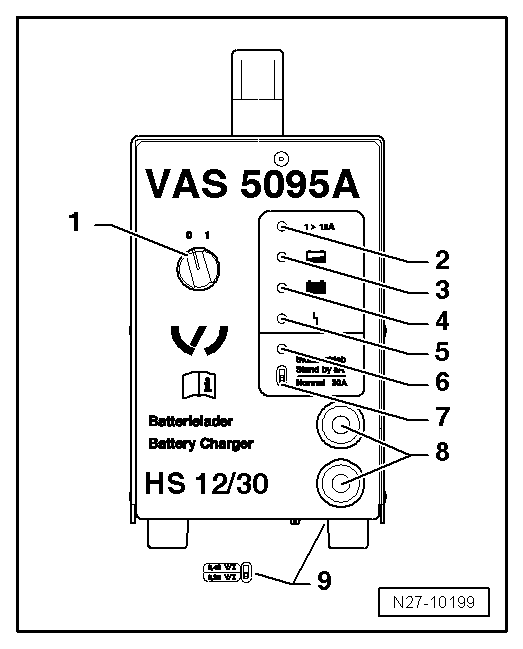
| Battery Charger -VAS5095A- |
| 1 - |
Switch ON/OFF (0 = Charger OFF) |
| 2 - |
Charge current display (I > 12 A) |
| 3 - |
Charge current display: battery partially charged > 90% |
| 4 - |
Charger sustain, lights up green when battery is charged |
| 5 - |
Interference indicator |
| 6 - |
Support mode indicator |
| 7 - |
Support mode/normal mode selector switch |
| 8 - |
Charger cables, red charging clamp “+”, black charging clamp
“-”. |
| 9 - |
Battery type selector switch (base of loading devices) |
|
|
 |
Special tools and workshop equipment
required
Battery Charger -VAS5095A-
WARNING
...
© 2016-2026 Copyright www.vwpolo.net


 Battery, Charging with Battery Charger -VAS5095A