Volkswagen Polo Service & Repair Manual: 6-Pin Universal Oxygen Sensor, Removing and Installing
 Note Note
| Use the faulty sensor as a guide for installing all of the
accompanying attachments, cable ties or marking bands. |
| Do not crimp or cut the wires otherwise the functionality of
the heated oxygen sensor (HO2S) will be diminished. |
| – |
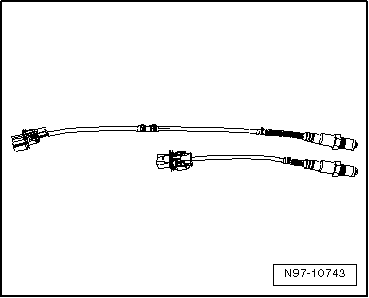
Remove the old heated oxygen sensor (HO2S). |
|
|
|
| – |
Lay both of the oxygen sensor next to each other so the
sensor housings are the same level. |
|
|
|
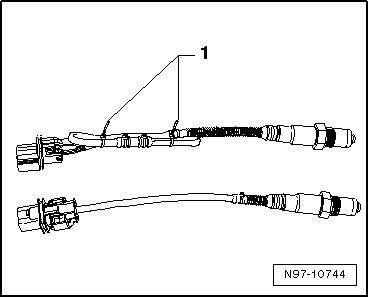
| – |
Tie the excess length of the sensor (approximately 50 to 250
mm) back so it is the same length as the faulty sensor and
secure it with cable ties -1-. |
| – |
Install the new oxygen sensor in the vehicle. |
|
|
|
Note
Do not repair the heated oxygen sensor wires. Repairing may
result in malfunctions.
Use the faulty sensor as a guide ...
Note
In addition to using the part number, the protective pipe
can also be used for identification.
Version D1, 6 openings, 3.5 mm eac ...
Other materials:
Battery Charger -VAS5903- Device Description
WARNING
Risk of injury. Follow all Warnings and Safety
Precautions. Refer to
→ Chapter „Warnings and Safety Precautions“.
WARNING ...
Empty Refrigerant Circuit
–
Remove malfunctioning component.
–
Remove the A/C compressor.
–
Remove oil drain plug from A/C compressor.
Note
To speed up refrigerant oil drai ...
Changing bulbs in the front bumper
Fig. 182 In the front bumper,
right-hand side: removing the cover and headlight
Fig. 183 In the front bumper,
right-hand side: removing the cover and headlight
First read and observe the introductory
information and safety warnings
The actions should onl ...
© 2016-2026 Copyright www.vwpolo.net

 4-Pin Heated Oxygen Sensor (HO2S), Removing and Installing
 Oxygen Sensor Unit Protective Pipes