Volkswagen Polo Service & Repair Manual: Wires with Cross Section up to 0.35 mm 2,
Repairing
| Special tools and workshop equipment
required |
| Crimping Pliers - .35-2.5mm -VAS1978/1A- |
| Wiring Harness Repair - Crimping Head - .35-2.5mm
-VAS1978/1-1- |
| When repairing wires with a cross-section up to 0.35 mm2,
new contacts must always be crimped on using the Crimping Pliers
- JPT -VAS1978/9A- or the Wiring Harness Repair - Crimping Plier
- Base Tool -VAS1978/1-2- with the Wiring Harness Repair Set -
Crimping Head - JPT -VAS1978/9-1- installed. Due to the low
current strengths of these wires in the micro- to milli- range,
contacts crimped on incorrectly lead to continuity resistances
and cause malfunctions or failure of the respective system. The
most frequent applications of these contacts are |
| By using the Crimping Pliers - JPT -VAS1978/9A- or the
Wiring Harness Repair - Crimping Plier - Base Tool -VAS1978/1-2-
with the Wiring Harness Repair Set - Crimping Head - JPT
-VAS1978/9-1- installed, the correct connection between crimp
contact, wire and single wire seal is guaranteed. The tool is to
be used only for the purpose described. |
 Note Note
| Contacts in a normal and a gold-plated version are crimped
onto repair wires. The same version of the contact that was
installed at the factory must always be used for repairs. |
| Crimping A New Contact with Single Wire Seal |
| – |
Insert the Wiring Harness Repair Set - Crimping Head - JPT
-VAS1978/9-1- into the Wiring Harness Repair - Crimping Plier -
Base Tool -VAS1978/1-2-. Refer to
→ Chapter „Crimping Pliers - .35-2.5mm -VAS1978/1A-“. |
|
|
|
| – |
Place the single wire seal onto the repair wire. |
Note
| When doing this, the smaller diameter of single wire seal
must be facing in the direction of the contact to be crimped on. |
|
|
|
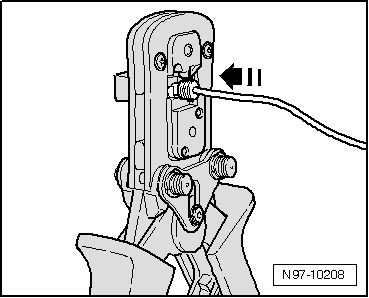
| – |
Open crimp pliers and place the repair wire end into
stripping slot of crimp pliers. |
|
|
|
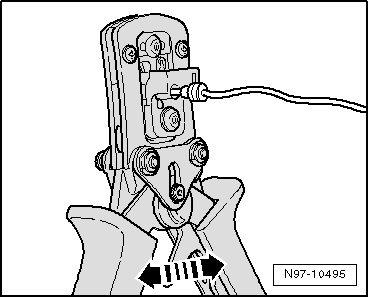
| – |
Close crimp pliers completely. |
| – |
Open crimp pliers again and remove the stripped wire end. |
|
|
|
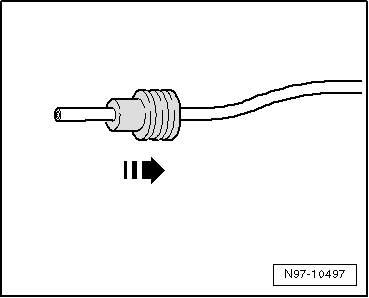
| – |
Slide single wire seal in direction of stripped wire end
until it rests flush with the wire insulation. |
|
|
|
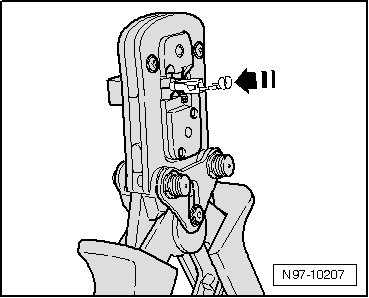
| – |
Place new crimp contact into mount on crimp pliers. |
|
|
|
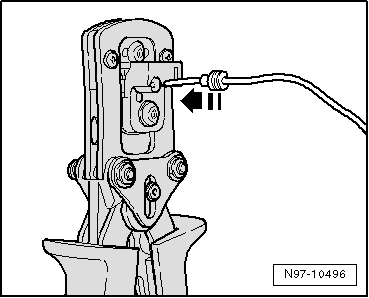
| – |
Insert the stripped wire end with positioned single wire
seal into crimp contact until it makes contact on “wire stop”. |
| – |
Crimp the contact, wire and single wire seal by closing
crimp pliers completely. |
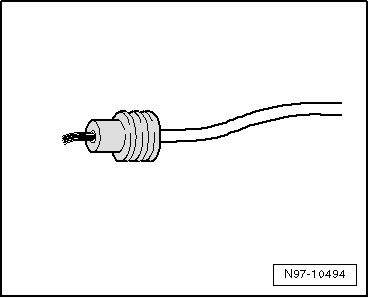
| – |
Open crimp pliers again and remove the finished crimped-on
contact. |
|
|
|
| A correctly performed crimp is distinguished by a clean
compression of wire and single wire seal in the contact and has
an impression on the rear side which identifies that the crimp
was performed by a professional using the correct tool. |
|
|

|
A new repair concept has been developed for repairing
antenna wires. Refer to
→ Chapter „Antenna Wires, Repairing“.
Instead of a ...
Repair point with single crimp connection
–
Free up wire intended for repair (approximately 20 cm to
both sides of repair point).
...
Other materials:
Tire Pressure Monitoring Sensor with Valve, Removing and Installing
Removing
–
Remove the union nut -1-.
–
Remove Tire Pressure Monitoring Sensor-2-
from rim well.
Installing
...
Dimensions
Fig. 17 Dimensions
First read and observe the introductory information
and safety warnings
The data in the table apply to the most basic German model.
The specified values can vary due to different tyre and wheel sizes, if additional
equipment is fitted, for different model versions, for ret ...
Side view
Fig. 1 Overview of the right side of
the vehicle Positions ③, ④, ⑤ and ⑤ are also at the same position on the left
side of the vehicle.
Key for :
Tank flap
Roof aerial
Attachment points for the mounts and
roof carrier
Door release lever
Exterior mirrors
Jacking p ...
© 2016-2026 Copyright www.vwpolo.net

 Antenna Wires, Replacing
 Wire Break with Single Repair Point