Volkswagen Polo Owners Manual: Securing mounts, roof bars or load carrying system
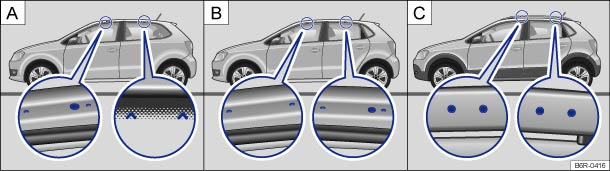
Fig. 90 Securing points for mounts or roof bars (both sides) A: for 2-door vehicles without roof railing. B: for 4-door vehicles without roof railing. C: for vehicles with roof railing
 First read and observe the introductory information
and safety warnings
First read and observe the introductory information
and safety warnings
Mounts or roof bars serve as the basis for special load carrier systems. Special load carriers must then be added to transport luggage, bicycles, skis, surfboards or boats safely. Suitable accessories are available from your Volkswagen dealership.
Mounts, roof bars and load carriers must always be attached correctly. Please read the fitting instructions provided.
Vehicles without roof railings: attaching mounts and load carrier system
2-door vehicles: the holes or markings for the front mount securing points are located on the underside of the roof side members A (left-hand magnification). The holes or markings for the securing points are only visible when the door is open. The markings for attaching at the rear are at the top on the side windows A (right magnification).
4-door vehicles: the holes or markings for the mount securing points are located on the underside of the roof side members and are visible only when the doors are open B.
The roof carrier must only be attached at the markings shown in the illustration .
After fitting the mounts properly as per the instructions provided, attach the load carrier to the mount.
Vehicles with roof railings: attaching roof bars and load carrier system
The attaching holes are located on the inside of the roof rail C.
The roof bars must only be attached at the markings shown in the illustration.
After fitting the roof bars properly, attach the load carrier to the roof bars in accordance with the assembly instructions provided.
Ensure that there is enough space between the roof carrier system to avoid damaging it.

 WARNING
- Always observe the manufacturer's instructions.
- Use mounts or roof bars and load carriers only when they are undamaged and fitted correctly.
- The mounts may only be attached at the markings shown in the illustration .
- Fit mounts or roof bars and load carriers correctly.
- Check the bolts and anchorage points before starting your journey and adjust as necessary after driving a short distance. During a long trip, check all bolts and fasteners at each stop.
- Special fixtures for items such as bicycles, skis, surfboards, etc. should always be properly installed.
- Do not carry out any changes or repairs to the mounts, roof bars or the load carrier system.

Read and note the fitting instructions for the mounts, roof bars and the load carrier system provided and always carry the instructions in the vehicle.
 Introduction
This chapter contains information on the following subjects:
→ Securing mounts, roof bars or load carrying system
→ Loading the load carrier system The roof of the vehicle has been ...
 Loading the load carrier system
First read and observe the introductory information
and safety warnings
Loads can be attached securely only when the mounts, roof bars and load carrier
system are fitted correctly .
Maximum per ...
Other materials:
Engine oil consumption
First read and observe the introductory information
and safety warningsEngine oil consumption can vary from engine to engine
and can change during the working life of an engine.
Depending on how you drive and the conditions in which the car is used, oil consumption
can be up to 1.0 litre/2,0 ...
Changing gear using Tiptronic
Fig. 113 Selector lever in Tiptronic position
(left-hand drive) The controls are mirrored for right-hand drive vehicles
Fig. 114 Steering wheel with paddles for
Tiptronic
First read and observe the introductory information
and safety warnings Using Tiptronic, the gears can be shifted
u ...
Two-Part Fine Filling Paste, Flexible
Definition:
Two-Part Fine Filling Paste, Flexible -LSP 787 100 A1-
Edition 07/2010
Product Description
The Two-Part Fine Filling Paste, Flexible -LSP 787 100 A1-
is a two component filler paste with hig ...
