Volkswagen Polo Service & Repair Manual: O-Ring
 Caution
| Non-approved tools or materials such as leak sealing
additives can cause damage or malfunctions in the
system. |
| Only use tools and materials approved by the
manufacturer. |
| The warranty is voided if non-approved tools or
materials are used. |
|
| All components of the refrigerant circuit submitted for
quality observation are always to be sealed (use original
sealing caps of original part). |
| Replace damaged or leaking components of refrigerant
circuit. Refer to
→ Chapter „Components, Replacing“. |
| To date, the original parts (compressor, reservoir,
receiver/dryer, evaporator and condenser) have been filled with
nitrogen gas. This charge is being gradually discontinued. There
is little or no pressure equalization when removing the sealing
plugs from the original part. |
|
|
|
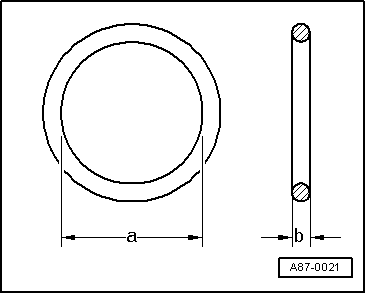
| These o-rings seal off the connection points between
individual components of the refrigerant circuit. |
| Only O-rings that are resistant to refrigerant r134a and
refrigerant oil must be installed. Make sure they are original
replacement parts. |
| Refer to the Parts Catalog. |
| Make sure diameters -a- and
-b- are correct. |
| Coat with refrigerant oil before installing |
 Note Note
| The color coding of refrigerant circuit o-rings with R134a
has been discontinued. Colored and black O-rings are used. |
| Refer to the Parts Catalog. |
|
|
|
Caution
Non-approved tools or materials such as leak sealing
additives can cause damage or malfunctions in the
sys ...
Caution
Non-approved tools or materials such as leak sealing
additives can cause damage or malfunctions in the
sys ...
Other materials:
What happens to vehicle occupants who have not fastened their seat belts
Fig. 47 An unbelted driver is thrown forwards
Fig. 48 The unbelted rear passenger is
thrown forwards, hitting the belted driver
First read and observe the introductory information
and safety warnings
Many people believe that they can brace their weight with their hands in a minor
collisi ...
Evaporator
Caution
Non-approved tools or materials such as leak sealing
additives can cause damage or malfunctions in the
system.
Only use tools and materials approved by the
manufactu ...
Bag hook
Fig. 89 In the luggage compartment: bag
hook
First read and observe the introductory information
and safety warnings
Bag hooks can be found to the left and right in the luggage compartment. Light
shopping bags can be secured here .
WARNING
Never use the bag hooks as fastening rings for s ...
© 2016-2026 Copyright www.vwpolo.net

 Expansion Valve
 Refrigerant Circuit Pipes and Hoses