Volkswagen Polo Owners Manual: Instrument overview
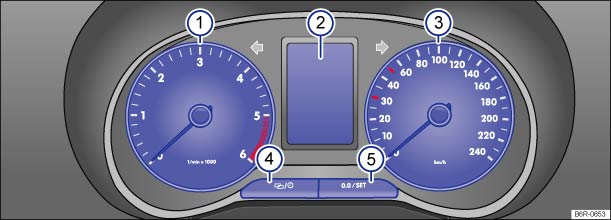
Fig. 10 Instrument cluster in the dash panel: type 1
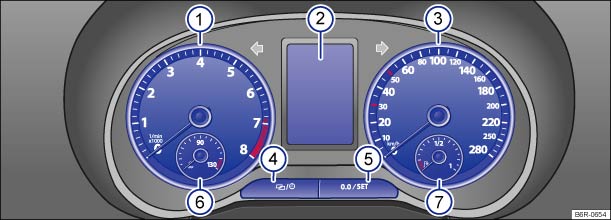
Fig. 11 Instrument cluster in the dash panel: type 2
 First read and observe the introductory
information and safety warnings
First read and observe the introductory
information and safety warnings
Descriptions of the instruments or :

Rev. counter (running engine speed in revolutions x 1,000 per minute).
The start of the red zone on the dial indicates the maximum engine speed that may be used in each gear when the engine is warm and after it has been run in properly. You should change up a gear or move the selector lever to D (or lift your foot off the accelerator) before the needle reaches the red zone .
 Displays .
  Speedometer
  Setting button for the clock
1).
Setting button for the clock
1). 
Reset button for the trip recorder display (trip).
- Press the


 button to reset to 0.
- Press the
 Engine coolant temperature
display
Engine coolant temperature
display or Autogas fuel tank display
in vehicles with autogas engine .
or Autogas fuel tank display
in vehicles with autogas engine .  Fuel gauge .

 NOTICE
- When the engine is cold, avoid high engine speeds, driving at full throttle and overloading the engine.
- The needle on the rev counter should only briefly point into the red area, as engine damage may otherwise be incurred.

Changing up a gear early will help to save fuel and minimise engine noise.

The fuel gauge is located in the lower field of the display or in the speedometer .
1) In some versions of the vehicle, it may be possible to adjust the clock settings using the Settings menu on the instrument cluster display .
 Introduction
When the outside temperature is low, the display in the instrument cluster
may take slightly longer to appear than it does when the outside temperatures is
higher.
Additional information and wa ...
 Displays
Fig. 12 A: bonnet open, B: tailgate
open, C: front left door open, D: right rear door open (only in four-door
vehicles)
First read and observe the introductory
information and safety warnings ...
Other materials:
Primer Metal
One-Part Anti-Corrosion Wash Primer
Definition:
One-Part Anti-Corrosion Wash Primer -ALN 002 003 10-
Edition 06/2011
Product Description
On ...
Introduction
This chapter contains information on the following subjects:
→ Locking or unlocking the driver door manually
→ Locking the front passenger door and rear doors manually
→ Unlocking the tailgate manually
→ Unlocking the selector lever lock manually
If the vehic ...
Indicator lamp
First read and observe the introductory information
and safety warnings
The central locking system indicator lamp is located in the driver door .
Depending on the vehicle equipment level, the vehicle may have an anti-theft
alarm and a SAFELOCK mechanism .
After locking ...
