Volkswagen Polo Service & Repair Manual: Crimping Pliers - .35-2.5mm -VAS1978/1A
| The Crimping Pliers - .35-2.5mm -VAS1978/1A- or the Wiring
Harness Repair - Crimping Plier - Base Tool -VAS1978/1-2-
together with the Wiring Harness Repair - Crimping Head -
.35-2.5mm -VAS1978/1-1-, or the Wiring Harness Repair Set -
Crimping Head - 4-6mm -VAS1978/2A- from the wiring harness
repair set is used to compress the crimp connectors. |
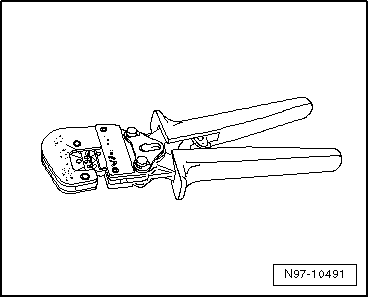
| Crimp connectors, pressing using the Crimping Pliers -
.35-2.5mm -VAS1978/1A-. Refer to
→ Chapter „Wire Break with Dual Repair Point“. |
| The following crimping heads are available for the Wiring
Harness Repair - Crimping Plier - Base Tool -VAS1978/1-2- |
| Crimping Head 0.35 mm 2 - 2.5 mm
2Wiring Harness Repair - Crimping
Head - .35-2.5mm -VAS1978/1-1- |
| Crimping Head 4.0 mm 2 - 6.0 mm
2Wiring Harness Repair Set -
Crimping Head - 4-6mm -VAS1978/2A- |
| Wiring Harness Repair Set - Crimping Head - JPT
-VAS1978/9-1- |
| In conjunction with Wiring Harness Repair Set - Crimping
Head - JPT -VAS1978/9-1-, the crimping pliers are used to crimp
contacts onto individual wires when repairing wiring
cross-sections up to 0.35 mm2. Refer
to
→ Chapter „Wires with Cross Section up to 0.35 mm
2, Repairing“. |
| Changing the Crimping Head |
| – |
Open crimp pliers completely. |
|
|
|
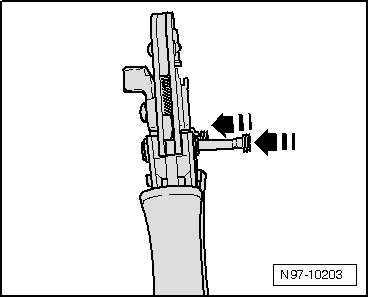
| – |
Disengage both locking pins in direction of
-arrows- from crimp pliers basic
tool. |
|
|

|
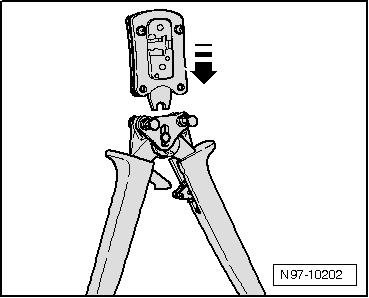
| – |
Insert the required crimping head from above
-arrow- in crimp pliers basic tool. |
|
|
|
| – |
Lock the crimping head by pressing in the pins
-arrows- into crimp pliers basic
tool. |
|
|
|
Caution
When heat-shrinking crimp connections, be careful
not to damage any other wiring, plastic parts or
insulat ...
Other materials:
Introduction
This chapter contains information on the following subjects:
→ Warning and indicator lamp
→ Pedals
→ Manual gearbox: selecting a gear
→ Automatic gearbox: selecting a gear
→ Changing gear using Tiptronic
→ Driving with an ...
Drink holders in the centre console
Fig. 102 In the front centre console:
drink holders
Fig. 103 Drink holder in the rear centre
console: folding out the drink holder
First read and observe the introductory information
and safety warnings
Opening and closing the rear drink holder
To open, fold the drink holder down in the ...
Locking or unlocking the driver door manually
Fig. 155 Door handle on driver
door with lock cylinder
First read and observe the introductory
information and safety warnings
If locked manually, all doors are locked. If unlocked manually, only the
driver door is unlocked. Observe information on the anti-theft alarm .
Fold the key bi ...
© 2016-2026 Copyright www.vwpolo.net

 Wiring Harness Repair Set - Hot Air Blower -VAS1978/14A