Volkswagen Polo Service & Repair Manual: Tires, Mounting, Wheels without and with Tire Pressure Monitoring System
| Only trained personnel can perform the assembly work on
run-flat tires. |
| If equipped check the tire pressure monitoring sensor with
the vehicle diagnostic tester and if necessary replace. |
| – |
Bring the tires to the mounting temperature. Refer to
→ Chapter „Tires, Bringing to Mounting Temperature“. |
 Note Note
| When cleaning disc wheel (rim), the tire pressure monitoring
sensor (if equipped) must not come into contact with water or be
blown with pressurized air. |
| If equipped handle the glued-on wheel trim carefully.
Surface slightly scratched. |
| Replace the damaged rim wheel trim. |
| – |
Insert new tire valve with Valve Fitting Tool -VAS6459-. |
| – |
Coat rim flanges, tire beads and inside of upper tire beads
thoroughly with tire mounting paste. |
| – |
Place the inner side of the tire on the rim. |
| – |
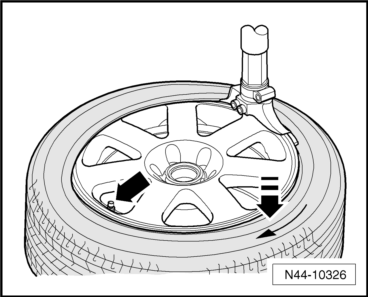
Turn the rim until the tire valve of the tire pressure
monitoring sensor aligns with the mounting head. |
|
|
|
Only trained personnel can perform the assembly work on
run-flat tires and ultra high performance tires.
If equipped check the tire pressure mo ...
Other materials:
Warning lamp and coolant temperature display
Fig. 138 Coolant temperature display in
instrument cluster: Ⓐ cold; Ⓑ normal; Ⓒ warning
First read and observe the introductory information
and safety warningsA display for the coolant temperature may be, depending
on the vehicle equipment, located in instrument cluster. In normal driv ...
Special Tools
Special tools and workshop equipment
required
Torque Wrench 1331 5-50Nm -VAG1331-
Crimping Pliers, Complete -VAS1978/1A-
...
Two-Part Brilliant Clear Coat
Definition:
Two-Part Brilliant Clear Coat -L2K 769 K04 A5-
Edition 10/2010
Product Description
Two-part HS brilliant clear coat is a high-gloss, VOC
compliant high solid clea ...
© 2016-2026 Copyright www.vwpolo.net

 Note
Note Note
Note Tires, Mounting
 Tires, Mounting, Run-Flat Tires and Ultra High Performance Tires
 Caution