Volkswagen Polo Service & Repair Manual: Single Wire Seals, Installing
 Note Note
| Single wire seals prevent the penetration of water and dirt
into the contact housing. They are installed, for example, in
the engine compartment and must be reinstalled after a repair. |
| Single wire seal is crimped on at the factory together with
contact on the wire, this is not the case for repair wires.
Single wire seal must be slid onto wire first before crimping
the repair wire. |
| Single wire seals must always fit with the repair wire
cross-section. Outer circumference of single wire seal is
aligned according to chamber circumference of the contact
housing. Perform assembly using only the assembly tool with
correct fit. |
| Assembling Single Wire Seal |
|
|
|
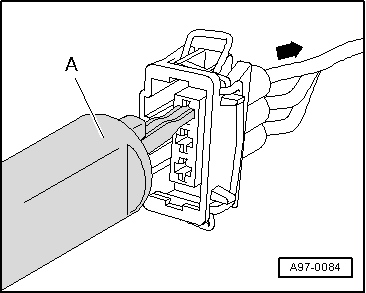
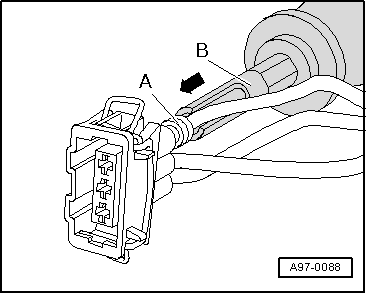
| – |
Release contact lock using assembly tool with correct fit
-A- and then pull wire with single
wire seal toward rear -arrow- out
of contact housing. |
|
|
|
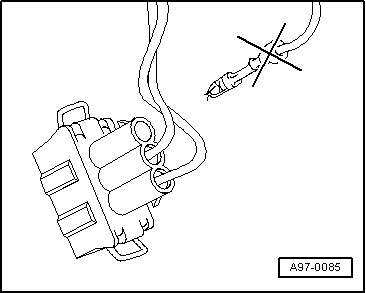
| – |
Cut off the old contact with single wire seal from the
vehicle-specific wiring harness. |
|
|
|
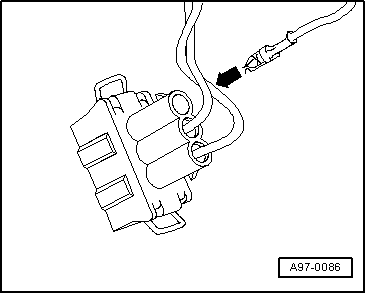
| – |
Slide repair wire with new contact into corresponding
chamber of contact housing until it engages. |
|
|
|
| – |
Put single wire seal -A- onto
free end of repair wire. |
Note
| When doing this, small diameter of single wire seal must
point toward contact housing. |
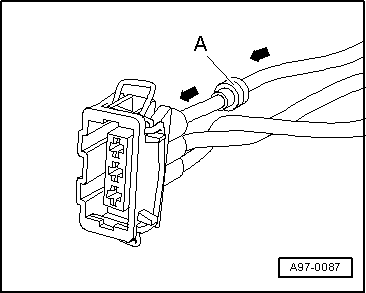
| – |
Slide single wire seal -A- onto
repair wire up to the contact housing. |
|
|
|
| – |
Slide single wire seal -A- into
contact housing until it stops using the corresponding assembly
tool -B-. |
|
|
|
| – |
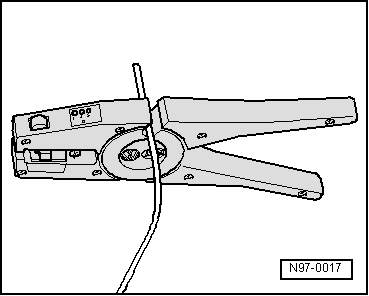
Shorten the repair wire and the vehicle-specific wiring
harness single wire as needed using the Wiring Harness Repair
Set - Wire Strippers -VAS1978/3-. |
| – |
Crimp the stripped ends of repair wire and single wire of
vehicle-specific wiring harness using crimp pliers and a crimp
connection as described in chapter “Wire break with single
repair point”. Refer to
→ Chapter „Wire Break with Single Repair Point“. |
|
|
|
First, open or release if necessary the secondary lock of
the contact housing. Refer to
→ Chapter „Contact Housings, Releasing and Disassembling“.
...
Note
For technical reasons, the contact housing for the wire
terminals can be supplied only with the contacts p ...
Other materials:
Introduction
This chapter contains information on the following subjects:
→ Indicator lamp
→ Description of the central locking system
→ Locking and unlocking the vehicle from the outside
→ Locking and unlocking the vehicle from the inside
→ SAFELOCK mechanism
&nb ...
Special Tools
Special tools and workshop equipment required
Wheel Bolt Master Socket Set -T10101-
Wheel Bolt Master Socket Set -T10101A-
Wheel Bolt ...
Tread Depth, Measuring
Note
When measuring tread depth, take measurements in the main
grooves.
Do not take measurements at the tread wear indicator.
Tread depth of a tire must be mea ...
© 2016-2026 Copyright www.vwpolo.net

 Contacts in Contact Housing, Repairing
 Contact Housings, Repairing Wire Terminals