Volkswagen Polo Service & Repair Manual: Searching for Refrigerant Circuit Leaks with Compressed Air or Nitrogen
 Note Note
| This repair manual describes different methods for detecting
leaks in the refrigerant circuit. These methods have been tested
and result in success when used correctly. |
| If when searching for compressed air / Nitrogen or vacuum
leaks none are found, add a leak detection additive i.e UV leak
detection additive, to the electric leak detecting unit. |
| Minor leaks can be detected using an electronic leak
detector or UV leak detector lamp. |
| Many methods for detecting leaks in the refrigerant circuit
are offered in the open market. These methods do not always have
optimum results. If they are not used exactly according to
specifications, they can indicate refrigerant circuit components
have leaks even when they do not. Also, refrigerant circuit
components can be damaged by some methods. |
| Do not repair components with leaks. Replace them with new
original parts. |
| Do not charge a leaking refrigerant circuit with
refrigerant. Evacuate the circuit and check it for leaks before
charging. Refer to
→ Chapter „Refrigerant Circuit with A/C Service Station,
Draining“. |
 Caution
| If it is suspected that chemicals were added to the
refrigerant circuit to seal leaks, do not connect the
A/C service station and do not extract the refrigerant. |
| Chemicals that seal leaks in the coolant circuit
form deposits that affect the function of the A/C system
and lead to failure of the A/C system and the A/C
service station. |
| Inform that customer that there are substances in
the A/C system that are no approved by Volkswagen. This
A/C system cannot be drained or serviced in the
workshop. |
|
 Note Note
| VW does not approve the use of chemicals to seal leaks in
the refrigerant circuit. |
| Chemicals used to seal leaks in the refrigerant circuit
often react with air and the moisture in it. They cause deposits
in the refrigerant circuit and the A/C service station and
malfunctions in valves and other components that they come in
contact with. These deposits cannot be removed completely from
the components, even by flushing. |
| Chemicals used to seal leaks in the refrigerant circuit
usually cannot be detected from outside. The label that should
be applied to identify it is often missing. Therefore be careful
when working with if you do not know its service history. |
| Accessories offer containers used to separate out these
chemicals (used to seal leaks in the refrigerant circuit).
Because VW does not approve the use of these chemicals, there is
no evidence of the effectiveness of these filters. |
 Note Note
| A leak can be identified if a maximum of pressure of 15 bar
(218 psi) can be generated in the refrigerant circuit using
clean, dry compressed air or nitrogen. Refer to
→ Chapter „Refrigerant Circuit, Flushing with Compressed Air and
Nitrogen“. If the leak is large enough, the sound of
escaping air or gas can be heard at the location of the leak. |
|
|
|
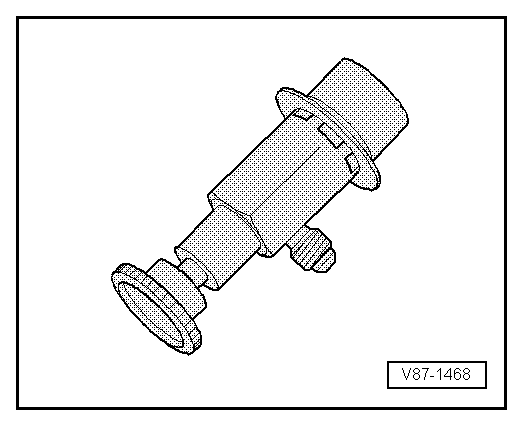
| Use the service connection for the compressed air or
nitrogen. |
|
|

|
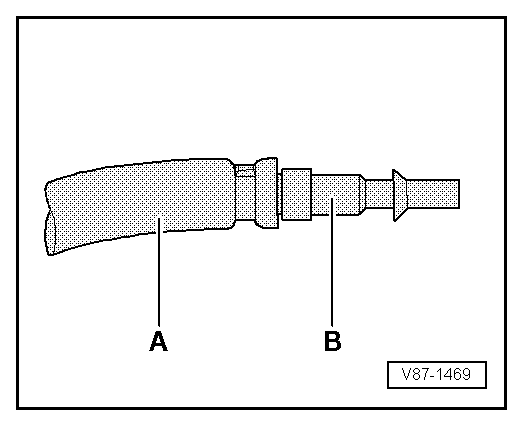
| The quick-release coupling adapter for service connections
can be connected to the air compressor using a modified filler
hose -A- (for example, with 5/8" 18
UNF threads, different from the threads on the quick-release
coupling adapter) and a suitable adapter
-B-. Refer to
→ Chapter „Improvised Tools“. This keeps humidity,
oil and dirt coming out of the workshop compressed air system
from getting into the A/C refrigerant circuit. Also use a
combination fine-gauge filter for compressed air systems such as
those that are standard in paint shops. Install it between the
compressed air system and the filler hose
-A- . Refer to the Special Tools and Equipment Catalog. |
|
|

|
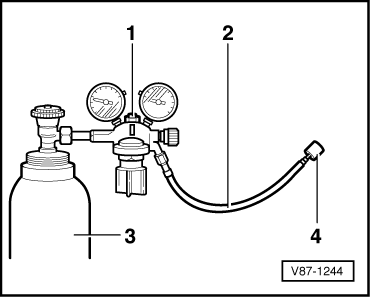
| A compressed gas cylinder filled with nitrogen
-3- can be connected to the closed
refrigerant circuit using a pressure gauge battery with a
pressure reducer for nitrogen (maximum reduction pressure: 15
bar (218 psi)) -1- and a filler
hose -2- (for example, with 5/8" 18
UNF threads) connected to the service connection. A
quick-release coupling adapter must also be connected to the
service connection. Refer to
→ Chapter „Improvised Tools“. |
| – |
Slowly increase the pressure in the refrigerant circuit to a
maximum of 15 bar (218 psi). |
 WARNING
| The maximum permitted working pressure is 15 bar
(218 psi). |
| When testing for leaks with nitrogen, always work
with a pressure reducer for nitrogen bottles. |
|
| – |
Find the location of the leak by listening for the sound of
venting gas. An Ultrasonic Tester VAG1842S -VAG1842S- will aid
in detecting the origin of noise. |
| – |
Use clean, dry compressed air to force the nitrogen out of
the refrigerant circuit. The nitrogen must not get into the
Service bottle. Reason: gases that do not condense do not get
into the Service bottle. |
| – |
Evacuate and again observe the vacuum display over a period
of hours. Only when the vacuum is maintained can the refrigerant
circuit be charged. |
| If there is a leak that is small enough that no air or very
little air vents through it and the A/C service station can
generate a sufficient vacuum. The vacuum indicator does not
increase after switching the A/C system service station or only
increases slowly, indicating that air is only entering through a
small leak. |
| – |
Add 100 grams of refrigerant to the circuit, find the
location of the leak using an electronic leak detector and
repair it or add UV contrast dye to the refrigerant and find the
location of the leak with the leak detection system VAS6201 or
succeeding model and repair it. Refer to
→ Chapter „Refrigerant Circuit, Tracing Leaks, with Electronic
Leak Detector -VAG1796-“ or
→ Chapter „Refrigerant Circuit, Tracing Leaks, with Leak
Detection System -VAS6196- or Leak Detection Kit -VAS6201A- or
Succeeding Model“. |
| – |
Empty the refrigerant circuit, if necessary. Refer to
→ Chapter „Discharge Refrigerant Circuit with A/C Service
Station“. |
| – |
Evacuate and check the vacuum display again over several
hours. Only when the vacuum is maintained can the refrigerant
circuit be charged. |
|
|
 |
Note
This repair manual describes different methods for detecting
leaks in the refrigerant circuit. These methods have been tested
and result in ...
Other materials:
Checklist
Please note the following for the cleaning and maintenance of the
seat covers :
Before getting into the vehicle, close all
Velcro fasteners that could touch the cloth seat covers and fabric trims. Open
Velcro fasteners can cause damage to cloth seat covers and fabric trims.
Avoid ...
Introduction
This chapter contains information on the following subjects:
→ An economic driving style
→ Driving in a fuel-efficient manner
Fuel consumption, environmental impact and wear on the engine, brakes and tyres
depend largely on three factors:
Personal driving style.
...
Indicator lamp
First read and observe the introductory information
and safety warnings
Lit up
Possible cause
Cruise control system (CCS) is controlling the speed.
Several warning and indicator lamps will light up briefly as a functional check
whe ...
© 2016-2026 Copyright www.vwpolo.net

 Note
Note Note
Note Note
Note Refrigerant Circuit, Tracing Leaks, with Electronic Leak Detector -VAG1796
 Caution

 WARNING
