Volkswagen Polo Service & Repair Manual: Fold Corrosion Servicing Notes
| Corrosion on the Fold Edges, for Instance on the Hood, Door
or also the Rear Lid |
| – |
Remove the corroded areas with
→ Chapter „Pneumatic Brush Grinder Set -VAS6446-“ or
→ Chapter „Brush Grinder Set -VAS6776-“. |
| – |
Sand the overlapping areas with P360 - P400 sandpaper. |
| – |
Clean the base surface with Silicone Remover. |
| – |
After a corrosion repair and before sealing, insulate the
base surface with Two-Part Wash Primer -LHV 043 000 A2- and then
fill with Two-Part HS Performance Filler. |
| – |
After the filler has dried, the filled area must be dry
sanded with P400- P500. While doing so, make sure to avoid
“sanding through”. Then clean the sanded areas with Silicone
Remover. |
| – |
After the filler has dried and has been sanded, the metal
edges in the fold area must be thinly sealed with a fine seam
sealant. Refer to
→ Chapter „Sealing Materials“. The fine seam sealant
must match the original state. Refer to
→ Paint; Rep. Gr.00. |
 Note Note
| When repairing, the seam sealant is to be returned to
replicate stock visual appearance and layer thickness. |
| Sealing seams near attachments to be installed must be
applied smoothly In order to avoid damage and malfunctions. |
| Water drain holes must remain free. |
| All threaded pins and weld nuts with M-threads, as well as
all other pins and contact surfaces for the assembly must be
functional after the sealant application. |
| The sealing material cannot be applied on blank sheet metal,
but rather on filled surfaces. |
| – |
Recreate the subsequent paint system according to the
manufacturer's specifications. |
| – |
Seal the cavities around the fold area with
→ Chapter „Suction Feed Spray Gun -VAG1538-“. Refer
to
→ Chapter „Preservation“. |
Note
| Service work is effective only when the fold area can be
sealed airtight from the inside (so that no moisture can get
in). |
|
|
|
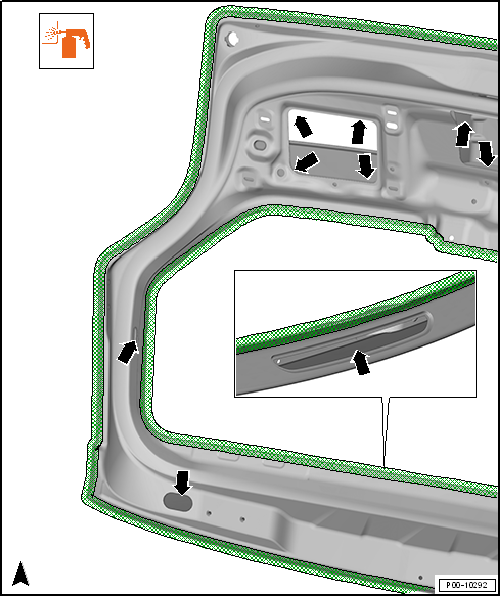
| Cavity Sealant Area Example on Rear Lid |
|
|
|
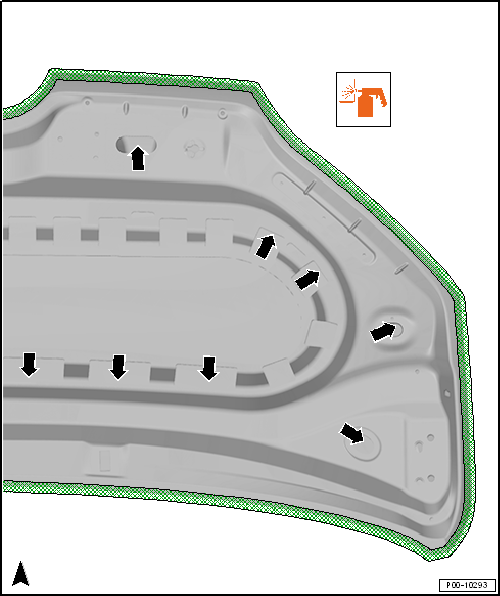
| Cavity Sealant Area Example on Hood |
|
|
|
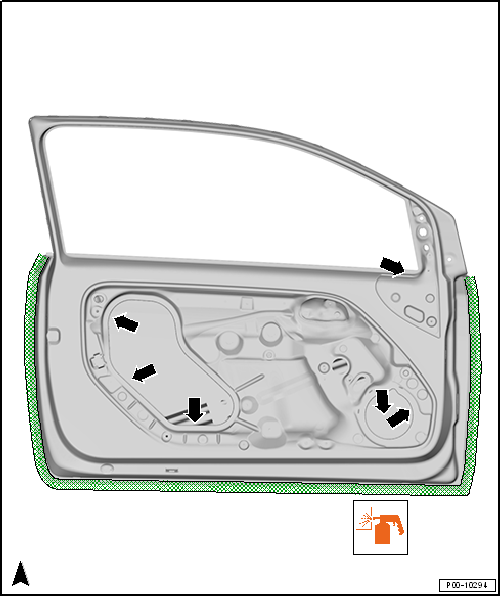
| Cavity Sealant Area Example on a Door |
|
|
|
Note
The corrosion protection in the fender seam must be applied on all
replacement parts, on which the attached seal is not already present.
The additional ...
Attachments
Coat the insides of the fenders, doors, covers and lids
completely. A spray application wet in wet procedure is
sufficient.
...
Other materials:
Cigarette Lighter Illumination Bulb -L28-, Removing and Installing
Note
On some vehicle equipment levels, socket illumination is via
Light Emitting Diode (LED) instead of a bulb. These LEDs are
integrated with the illumination housing and cannot be serviced
or replaced separately.
...
Run-Flat Tire, Seal Inside-Technology
The vehicle can be equipped with run-flat tires as an
option.
The Seal Inside technology is a system that allows the
vehicle to continue driving even if the tire has been punctured
by a nail or screw: a protective coating on the in ...
Factory Paint Paint Structure
Structure of a Solid-Color Paint System, Conventional
Approximately 80-120 µm thick
1 -
Steel Panel
2 -
Zinc Phosphate Coating
3 -
Electr ...
© 2016-2026 Copyright www.vwpolo.net

 Fender Corrosion Repair Measures, in Wheel Housing Liner Contact Area
 Corrosion Protection for Body, Attached and Welded Parts