Volkswagen Polo Owners Manual: Cleaning and changing windscreen wiper blades
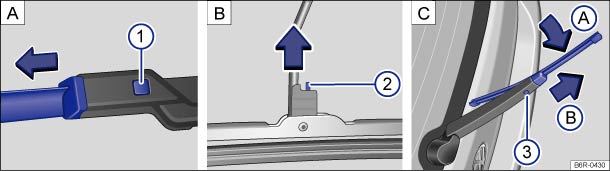
Fig. 142 Variants A and B: Changing the windscreen wiper blades. Variants B and C: Changing the rear window wiper blade
 First read and observe the introductory information
and safety warnings
First read and observe the introductory information
and safety warningsThe factory-fitted windscreen/window wiper blades are coated with graphite. The graphite coating ensures that the windscreen wiper blade moves quietly over the windscreen. If the graphite coating is damaged, the windscreen wiper will become louder.
Check the condition of the wiper blades on a regular basis. Rubbing wiper blades should be changed if damaged or cleaned if dirty .
Damaged wiper blades should be replaced immediately. Windscreen wiper blades can be bought from a qualified workshop.
Cleaning windscreen wiper blades
Note for the front windscreen wiper: move the wiper arms to the service position before lifting them .
- When lifting a wiper arm hold it only by the wiper blade mounting.
- Clean the windscreen wiper blade carefully using a damp cloth .
- Place the windscreen wiper arm back onto the windscreen.
Changing the windscreen wiper blades (Variant A)
- Move the wiper arms to the service position before lifting .
- When lifting a wiper arm hold it only by the wiper blade mounting.
- Press and hold the release button and simultaneously pull off the wiper blade in the direction of the arrow.
- Insert a new wiper blade with the same length and design onto the wiper arm. Push it on until it engages.
- Place the windscreen wiper arm back onto the windscreen.
Changing the windscreen or rear-window wiper blades (Variant B)
- Note for the front windscreen wiper: move the wiper arms to the service position before lifting them .
- When lifting a wiper arm hold it only by the wiper blade mounting.
- Press and hold release button and push off the wiper blade in the direction of the arrow at the same time. Then unhook the wiper blade and take it off in the opposite direction to the arrow.
- Push a new wiper blade of the same length and design slightly in the direction of the arrow and hook it onto the wiper arm again. Next, pull the windscreen wiper arm in the opposite direction to the arrow until it engages.
- Carefully push the windscreen wiper arm back onto the windscreen or rear window.
Changing the rear-window wiper blade (Variant C)
- When lifting a wiper arm hold it only by the wiper blade mounting.
- Press and hold down the release button and then pull the wiper blade upwards in the direction of the arrow Ⓐ and pull it off in the direction of the arrow Ⓑ. You may need to use some force to do this.
- Insert a new wiper blade with the same length and design on to the wiper arm against the direction of the arrow. Push it on until it engages Ⓑ. The windscreen wiper blade must be in a tilted position Ⓐ to do this.
- Place the wiper arm back onto the rear window.

 WARNING
- Therefore, always change windscreen wiper blades if they are damaged or worn and no longer clean the windscreen properly.

 NOTICE
- Damaged or dirty windscreen wipers can scratch the windscreen.
- Detergents containing solvents, hard sponges and other sharp objects can damage the graphite coating.
- Do not use fuel, nail varnish remover, paint thinner or similar products to clean the windows.
 Cleaning windows and exterior mirrors
First read and observe the introductory information
and safety warningsCleaning windows and exterior mirrors
Moisten the windows and exterior mirrors with commercially available, alcohol-based
gl ...
 Waxing and polishing the vehicle
First read and observe the introductory information
and safety warningsWaxing
Waxing protects the paintwork. You will need to re-wax the vehicle with a good
hard wax if water no longer clearly for ...
Other materials:
Evaporator Vent Temperature Sensor -G263- or Evaporator Temperature Sensor
-G308
Function:
The Evaporator Vent Temperature Sensor -G263- or Evaporator
Temperature Sensor -G308- determines the temperature behind the
evaporator. This value goes to the air conditioning control
module and serves as a reference signal for ...
Run-Flat Tire (PAX), Lettering On Side Wall
In contrast to conventional tires, other designations are
found on the tire flanks of PAX tires. In this way, these tires
can be allocated clearly.
PAX Tires, Designations
245 ...
Wire Break with Dual Repair Point
Repair point with intermediate wire section
–
Free up wire intended for repair at two points
(approximately 20 cm to both sides of respective repair points).
–
If required, remove wiring harness wra ...
