Volkswagen Polo Service & Repair Manual: Cigarette Lighter Socket, Removing and Installing
| Special tools and workshop equipment
required |
| Cigarette Lighter Release Tool -T40148- |
 Note Note
| The removal and installation for all sockets is performed in
the same way and is only described for the cigarette lighter
socket. |
 Caution
| Using force to remove cigarette lighter sockets
without illumination can result in damage to the
mounting sleeve retainers. |
| The Cigarette Lighter Release Tool -T40148- can only
be used to remove cigarette lighter sockets with
illumination. |
| The puller is not capable of releasing the retainers
on power sockets without illumination. |
| Sockets without illumination usually cannot be
removed without damage. |
|
| – |
Remove the cigarette lighter, blank plug, etc. from the
socket, if necessary. |
Note
| The illustration shows the socket removed. |
Caution
| The socket or mounting sleeve can be damaged. |
| Make sure the puller is seated properly or the
mounting sleeve retainers will not release. |
|
|
|
|
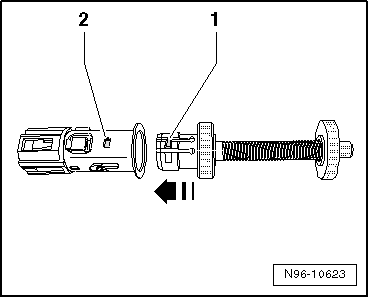
| – |
Insert puller -arrow- in
receptacle so retainers -1- engage
in recesses -2-. |
|
|
|
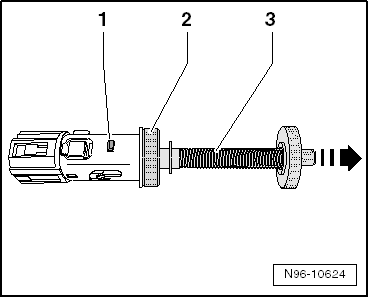
| – |
Release the mounting sleeve retainers by pulling on grip
piece -3- in direction of
-arrow-. |
| – |
Pull receptacle with puller out of mounting sleeve. |
Caution
| The wiring for the socket could get damaged. |
| Pay attention to the lengths of the electrical wires
when removing the outlet. |
|
|
|
|
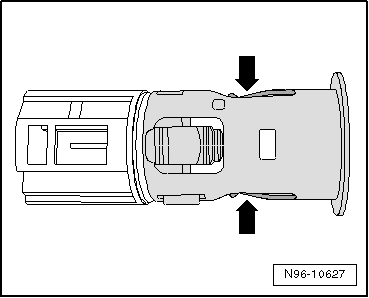
| – |
Carefully bend retainer springs together
-arrows-. |
| – |
Make sure the cigarette lighter insert is not ejected
completely into vehicle interior on completion of glow cycle,
and remains in receptacle. |
| Install in reverse order of removal. |
|
|
|
Caution
Using force to remove cigarette lighter sockets
without illumination can result in damage to the
mounting ...
Note
On some vehicle equipment levels, socket illumination is via
Light Emitting Diode (LED) instead of a bulb. These LEDs are
integrated with th ...
Other materials:
Retrofitting a towing bracket
Fig. 92 Dimensions and attachment points
for retrofitting a towing bracket
First read and observe the introductory information
and safety warnings
Volkswagen recommends having the towing bracket retrofitted by a qualified workshop.
The cooling system may need to be modified or heat shields ...
How to start the engine using jump leads
Fig. 191 How to connect the jump
leads when starting vehicles without start/stop system: discharged battery Ⓐ and
battery providing assistance Ⓑ
Fig. 192 How to connect the jump
leads when starting vehicles with start/stop system: discharged battery Ⓐ and
battery providing assistance ...
Belt height adjuster
Fig. 54 Next to the front seats: belt
height adjuster
First read and observe the introductory information
and safety warnings
The seat belt height adjusters for the front seats can be used to adjust the
position of the seat belt on the shoulder so that it can be fastened properly:
Pus ...
© 2016-2026 Copyright www.vwpolo.net


 Overview - Cigarette Lighter -U1-
 Cigarette Lighter Illumination Bulb -L28-, Removing and Installing