Volkswagen Polo Service & Repair Manual: Tires, Mounting, Run-Flat Tires and Ultra High Performance Tires
| Only trained personnel can perform the assembly work on
run-flat tires and ultra high performance tires. |
| If equipped check the tire pressure monitoring sensor with
the vehicle diagnostic tester and if necessary replace. |
| – |
Bring the tires to the mounting temperature. Refer to
→ Chapter „Tires, Bringing to Mounting Temperature“. |
 Note Note
| If equipped handle the glued-on wheel trim carefully.
Surface slightly scratched. |
| Replace the damaged rim wheel trim. |
| – |
Insert new tire valve with Valve Fitting Tool -VAS6459-. |
| – |
Coat rim flanges, tire beads and inside of upper tire beads
thoroughly with tire mounting paste. |
| – |
Place the inner side of the tire on the rim. |
|
|
|
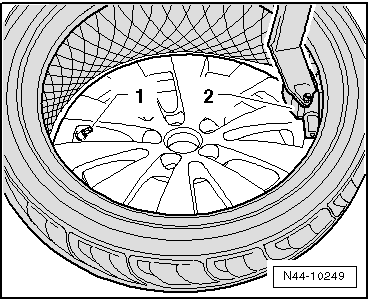
| – |
Turn the rim until the tire valve of the tire pressure
monitoring sensor aligns with the mounting head. |
|
|
|
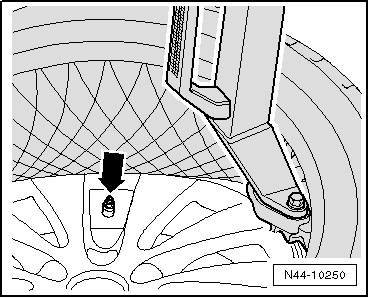
| – |
Let the tire dismounting/mounting machine run clockwise
until the mounting head is in front of the tire valve or the
tire pressure monitoring sensor -arrow-.
Slide the lower tire bead over the rim flange. |
|
|
|
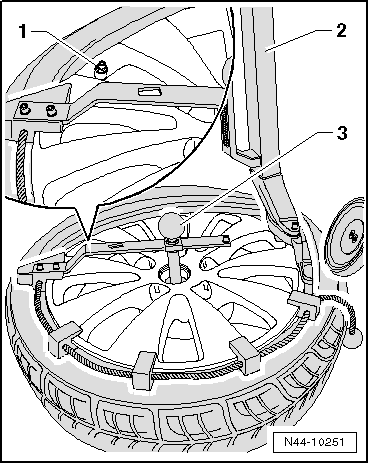
| – |
Turn the rim until the tire valve of the tire pressure
monitoring sensor -1- aligns with
the mounting head -2-. |
| – |
Install the hold-down device -3-
on the rim. |
|
|
|
Only trained personnel can perform the assembly work on
run-flat tires.
If equipped check the tire pressure monitoring sensor with
the ve ...
If necessary repair flat spots from standing. Refer to
→ Chapter „Flat Spots, Correcting“.
–
Dismount the tire. Refer to ...
Other materials:
Stowage compartment in the front centre armrest
Fig. 96 Stowage compartment in the front
centre armrest
First read and observe the introductory information
and safety warnings
To open, press the release button in the centre armrest (arrow) and lift
the cover all the way up.
To close, guide the cover down.
WARNING
The centre armrest ...
13-Pin« Trailer Socket
The backup lamps, »continuous current«
and charging cable can be used on the trailer with the
»13-pin« trailer socket. A
»13-pin« trailer socket is
recommended if a bicycle rack will be installed or a camper will
be towed.
...
Battery Test, Performing using Battery Tester -VAS6161
Special tools and workshop equipment
required
Battery Tester -VAS6161-
WARNING
Risk of injury. Follow all Warnings and Safety
Precautions. Refer to
→& ...
© 2016-2026 Copyright www.vwpolo.net

 Caution
 Tires, Mounting, Wheels without and with Tire Pressure Monitoring System
 Tires and Rims, Matching