Volkswagen Polo Service & Repair Manual: Evacuating and Charging Valve with Schrader Valve
| Special tools and workshop equipment
required |
| Torque Wrench 1783 - 2-10Nm -VAG1783- with Torque Wrench
1783 - 1/4" Drive Ratchet -VAS6234- |
 WARNING
| There is a danger of ice-up. |
| Refrigerant will leak out if refrigerant circuit is
not discharged. |
| Refrigerant must be extracted before opening
refrigerant circuit. If refrigerant circuit is not
opened within 10 minutes of extraction, pressure may
form in refrigerant circuit due to evaporation. Extract
the refrigerant once more. |
|
| Only valves and connections that are resistant to
refrigerant R134a and refrigerant oil must be installed. |
| Different connections (outer diameter) for high pressure and
low pressure side. |
| Always screw on sealing caps. |
|
|
|
| Refer to
→ Rep. Gr.87 for the vehicle-specific repair manual. |
 Note Note
| Torque Wrench 1783 - 2-10Nm -VAG1783- with Torque Wrench
1783 - 1/4" Drive Ratchet -VAS6234- |
| Use a suitable Refrigerant Sockets -T10364- to loosen the
Schrader valve insert. Refer to
→ Fig. „“ Refrigerant Sockets -T10364- for the high pressure/low
pressure side service connection valves in the refrigerant
circuit”“ |
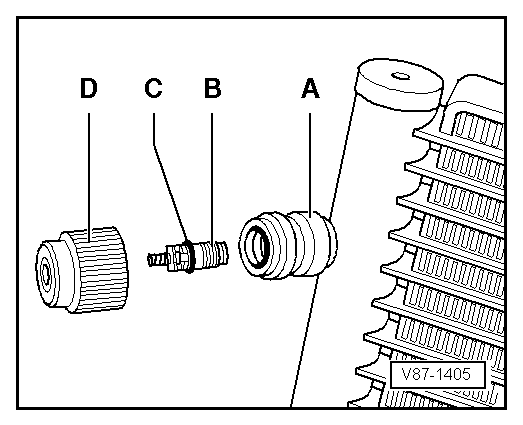
| A - |
Service connection (soldered in) |
| B - |
Schrader valve insert (2.4 ± 0.2 Nm) |
| C - |
O-ring (belongs to the valve) |
| D - |
Sealing cap with seal |
|
|
|
Special tools and workshop equipment
required
Torque Wrench 1783 - 2-10Nm -VAG1783- with Torque Wrench
1783 - 1/4" Drive Ratchet -VA ...
Other materials:
Primary Lock
The primary lock is the locking mechanism of an individual
crimp contact in the contact housing.
If necessary, housing securing mechanisms (secondary locks)
must be released or removed using specified tool before
releasing the contacts. ...
Volkswagen repair information
First read and observe the introductory information
and safety warningsVolkswagen Service information and official Volkswagen
repair information can be purchased from the following addresses:
Customers in Europe, Asia, Australia, Africa, Central and South America
Please contact a Volkswagen d ...
Tires, Mounting, Wheels without and with Tire Pressure Monitoring System
Only trained personnel can perform the assembly work on
run-flat tires.
If equipped check the tire pressure monitoring sensor with
the vehicle diagnostic tester and if necessary replace.
–
Bring the t ...
© 2016-2026 Copyright www.vwpolo.net


 Evacuating and Charging Valve, High Pressure Side