Volkswagen Polo Service & Repair Manual: CAN Bus Wires, Repairing
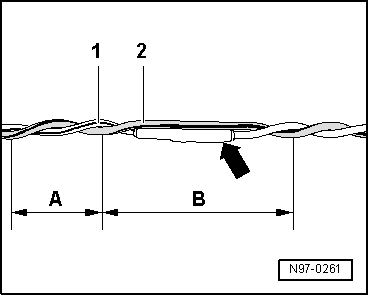
| Unshielded two-strand wiring -1-
and -2- with a cross section of
0.35 mm2 or 0.5 mm2
can be used as CAN bus wiring. |
| The color coding of CAN bus wires can be found in the
following table: |
|
|
|
| CAN High wire, powertrain |
orange/black |
| CAN High wire,
Convenience |
orange/green |
| CAN High wire,
Infotainment |
orange/violet |
| CAN-Low lead (all) |
orange/brown |
| Repairs on CAN-Bus wires can be performed with repair wire
with matching cross section and also with twisted wires
“green/yellow” or “white/yellow” from Parts Catalog. |
| When repairing Bus leads, both wires must be of the same
length. When twisting together wires -1-
and -2-, the lay length of
-A- = 20 mm must be observed. |
| While doing this, no section of the wire, for example, in
area of crimp connectors -arrow-,
may be greater than -B- = 50 mm
without twisting of the wires. |
| Wrap repair points with yellow adhesive tape to mark a
performed repair. |
|
|
|
Note
Observe general notes for repairs on the vehicle electrical
system. Refer to
→ Chapter „Vehicle Electrical System, General Repair
...
A new repair concept has been developed for repairing
antenna wires. Refer to
→ Chapter „Antenna Wires, Repairing“.
Instead of a ...
Other materials:
Blender
Definition:
Blender -LVE 013 100 A2-
Edition 10/2012
Product Description
Blender was developed for hassle-free two-part clear coat
and top coat touch-up.
...
Factory Paint Paint Structure
Structure of a Solid-Color Paint System, Conventional
Approximately 80-120 µm thick
1 -
Steel Panel
2 -
Zinc Phosphate Coating
3 -
Electr ...
Fold Corrosion Servicing Notes
Corrosion on the Fold Edges, for Instance on the Hood, Door
or also the Rear Lid
–
Remove the corroded areas with
→ Chapter „Pneumatic Brush Grinder Set -VAS6446-“ or
→ Chapter „Brush Grinder Set ...
© 2016-2026 Copyright www.vwpolo.net

 Airbag and Belt Tensioner Wire Repair Information
 Antenna Wires, Replacing