Volkswagen Polo Service & Repair Manual: 6-Pin Universal Oxygen Sensor, Removing and Installing
 Note Note
| Use the faulty sensor as a guide for installing all of the
accompanying attachments, cable ties or marking bands. |
| Do not crimp or cut the wires otherwise the functionality of
the heated oxygen sensor (HO2S) will be diminished. |
| – |
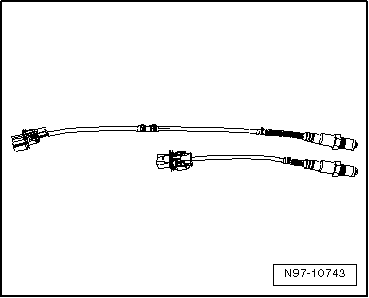
Remove the old heated oxygen sensor (HO2S). |
|
|
|
| – |
Lay both of the oxygen sensor next to each other so the
sensor housings are the same level. |
|
|
|
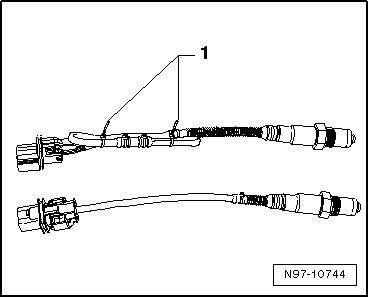
| – |
Tie the excess length of the sensor (approximately 50 to 250
mm) back so it is the same length as the faulty sensor and
secure it with cable ties -1-. |
| – |
Install the new oxygen sensor in the vehicle. |
|
|
|
Note
Do not repair the heated oxygen sensor wires. Repairing may
result in malfunctions.
Use the faulty sensor as a guide ...
Note
In addition to using the part number, the protective pipe
can also be used for identification.
Version D1, 6 openings, 3.5 mm eac ...
Other materials:
Infrared Dryer -VAS6874
Definition:
Infrared Dryer -VAS6874-
Product Description:
The infrared dryer is used to dry paste, filler, base paint,
top coats and clear coats on vertical surfaces using two clock
timers fo ...
Corrective Action When Vehicle Pulls to One Side
Test Conditions Before and During the Road Test
–
Check all suspension components on front and rear axle for
damage.
–
Check tire pressure and correct if necessary.
– ...
Introduction
This chapter contains information on the following subjects:
→ Ignition lock
→ Starting the engine
→ Stopping the engine
→ Electronic immobilizer
Notes in this chapter concerning the automatic gearbox are applicable
both for the automatic gearbo ...
© 2016-2026 Copyright www.vwpolo.net

 4-Pin Heated Oxygen Sensor (HO2S), Removing and Installing
 Oxygen Sensor Unit Protective Pipes