Volkswagen Polo Service & Repair Manual: Wheel, Mounting, Volkswagen Assembly Instructions
| Vehicles With Tire Pressure Monitoring Sensor. |
| If wheels are changed (for example, change from summer to
winter tires), wheel electronics send data as soon as speed of
new wheels exceeds 25 km/h (15.53 mph) The control module
automatically recognizes the identification numbers of the new
wheel electronics. |
| An acceleration data check also occurs with vehicle speed.
This process takes about 7 minutes. |
| Tire Pressure Monitoring Control Module -J502- must first be
in learning mode before it can automatically learn wheel
electronics. |
| Vehicle must stand for 20 minutes for this. This takes 5
minutes after a recognized tire puncture. |
| If the standing time is not followed, control module is not
in learning mode so system recognizes a malfunction and can only
automatically learn wheel electronics after standing 20 minutes. |
 Note Note
| When changing wheels, be sure to install only vehicle
manufacturer approved wheel/tires combinations with tire
pressures listed on the tank flap. |
| If unapproved wheel/tire combinations are installed, these
must have a certificate from the technical testing organization
for the particular vehicle and a second wheel set must be
programmed. Refer to Vehicle Diagnostic Tester. |
| An adaptation is also needed if tire pressure deviates from
pressures given on fuel filler flap. |
| Wheel Sets With Other Specified Tire Pressures |
| If a vehicle is equipped with tires which have specified
pressures different from those listed on fuel filler flap, these
tires (second wheel set) can also be monitored by the Tire
Pressure Monitoring System (TPMS). |
| Specified values for a second wheel set must be entered into
the system. Refer to Vehicle Diagnostic Tester. |
| Wheel electronics on wheels from second set are not
automatically recognized and learned by the tire pressure
monitoring system (as wheel electronics on vehicle manufacturer
approved wheel/tire combination set are). |
| To change to a second wheel set, the following steps must be
carried out: |
| Read the wheel electronic (tire pressure sensors)
identification numbers (IDs) before installing. |
| Switch the TPMS to wheel set 2. |
| Enter needed specified tire pressures and wheel electronic
IDs in system. |
| Continuation for All Vehicles |
Note
| The wrench size of the included wheel bolt adapter can be
vary from the wrench size of the respective master set. |
| Special tools and workshop equipment
required |
| Torque Wrench 1332 40-200Nm -VAG1332- |
| Wheel Bolt Master Socket Set -T10101- |
| Wheel Bolt Master Socket Set -T10101A- |
| Wheel Bolt Master Socket Set -T40004- |
| Wheel Bolt Master Socket Set -T40073- |
| Optimol AT Paste -G 052 109 A2- |
 WARNING
| The secure seating of the wheel bolts and the wheels
is only ensured if the instructions and checks below are
followed. |
|
Note
| After removing or installing one or multiple tires, the tire
pressure monitoring system must be recalibrated for vehicles
with tire pressure monitoring system. Refer to Vehicle
Diagnostic Tester. |
|
|
|
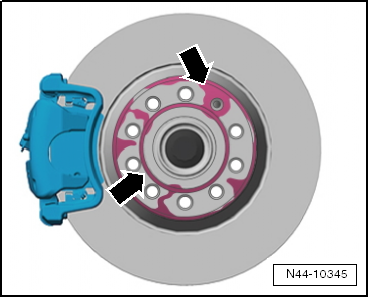
| – |
Make sure the contact surfaces
-arrows- on the brake rotor are free of corrosion and
dirt. |
|
|
|
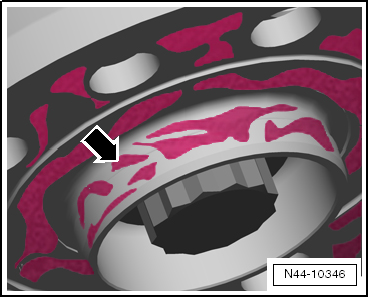
| – |
Make sure the contact surfaces -arrow-
on the brake rotor center seat are free of corrosion and dirt. |
|
|
|
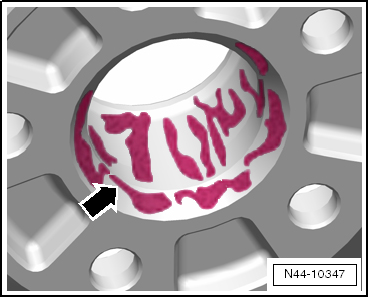
| – |
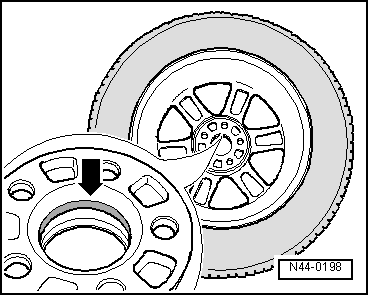
Make sure the contact surface -arrow-
on the wheel inner side (rim) as well as the central seat in the
rim is free of corrosion and dirt. |
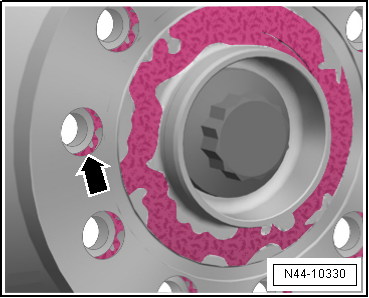
| – |
The spherical caps * in the
wheel bolt openings and the wheel bolt threads must likewise be
free of corrosion, dirt, oil or grease. |
| * The spherical cap is the
curved surface of a section of a sphere. |
|
|
|
| – |
Check whether the wheel bolts can be easily screwed in by
hand. The threads of the wheel bolts must not touch the holes in
the brake rotor -arrow-. |
| If the thread of the wheel bolt touches the hole
-arrow-, turn the brake rotor
accordingly. |
| Remove Any Dirt or Corrosion if Necessary: |
| Oil or grease from the contact surfaces |
| Oil or grease from the threads on the wheel hub |
| Oil or grease from the threads on the wheel bolts |
WARNING
| Heavily corroded, difficult to turn or damaged wheel
bolts must be replaced. |
|
| Applies to Light-Alloy and Steel Wheels |
| When a wheel is changed, the centering seat should be
sprayed with Wax Spray to prevent corrosion between the
centering seat and the wheel rim. Refer to the Parts Catalog. |
| – |
Thoroughly clean the centering seat on the wheel hub and the
centering surface on the rim. |
|
|
|
| – |
Apply wax in area of centering -arrow-
using a brush. |
| Always Make Sure that Only Centering
-arrow- is Waxed and Not Rim Contact Surfaces. As a
Consequence, the Brakes Would Become Contaminated While Driving
and Thereby Result In Poor Braking. |
WARNING
| Wheel bolts, contact surfaces of wheel/wheel hub and
the threads in the wheel hubs must not have wax applied
to them. Never apply lubricants or anti-corrosion
treatment to threads in wheel hubs. |
|
| 1 - |
When mounting a wheel, tighten all wheel bolts uniformly by
hand. |
| 2 - |
Tighten the wheel bolts diagonally to approximately 30 Nm. |
| 3 - |
Lower the vehicles onto the floor. Tighten all the wheel
bolts diagonally to the tightening specification using a torque
wrench. |
|
|
|
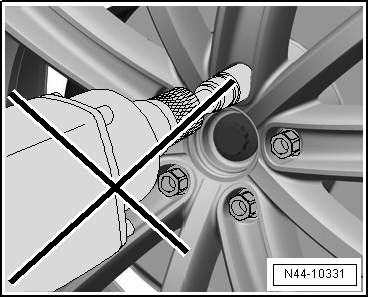
| Do Not Use an Impact Wrench! |
WARNING
| Do not use an impact wrench to install the wheel
bolts. |
|
| Refer to
→ Suspension, Wheels, Steering; Rep. Gr.44. |
|
|
|
Vehicles with Tire Pressure Monitoring Sensor.
If wheels are changed (for example, change from summer to
winter tires), wheel electronics send data a ...
Other materials:
Refrigerant Circuit with Expansion Valve and Evaporator
1 -
Evaporator
2 -
Expansion Valve
3 -
Valve for extracting, filling and measuring
4 -
Receiver/dryer with dryer bag/dryer cartridge
...
Symbols in the roof
Symbol
Meaning
Interior lights and reading lights
Electric panorama sliding/tilting glass roof
...
Gear-change indicator
First read and observe the introductory information
and safety warnings In some vehicles, the instrument cluster
will show which gear should be selected while the vehicle is in motion to reduce
fuel consumption.
Display
Meaning
The c ...
© 2016-2026 Copyright www.vwpolo.net

 Wheel, Mounting
 Wheel, Mounting, Audi Assembly Instructions