Volkswagen Polo Service & Repair Manual: Vehicle Diagnostic Tester, Connecting
| Special tools and workshop equipment
required |
| Vehicle Diagnostic Tester |
| Vehicle Diagnosis System - Diagnostic Cable -VAS5051/6A- (5
m) |
| Vehicle Diagnosis System - Updated Cable - 3m -VAS5051/5A-
(3 m) |
 WARNING
| During road tests using a vehicle diagnostic and
information system, there is the hazard of extreme to
lethal injuries! |
| If vehicle diagnostic and information system is
deposited in the action area of an airbag during a road
test, here is the hazard of extreme to lethal injuries
in the event the airbag deploys! |
| During road tests, have a person sitting in the rear
seat to operate the vehicle diagnostic and information
system. |
|
 Note Note
| All of the procedures described such as adaptations and
coding can be performed with the Vehicle Diagnostic Tester. |
| All work instructions can be reached in the operating modes
“Guided Fault Finding” and “Guided Functions”. |
| – |
Connect the Vehicle Diagnostic Tester. Refer to
→ Chapter „Vehicle
Diagnostic Tester, Connecting“. |
Note
| Follow the current operating instructions for the Vehicle
Diagnostic Tester, which can be displayed by selecting the
“Administration” and “operator's handbook” buttons. |
Note
| For the diagnosis, only the diagnostic cables listed above
are to be used since only these are equipped with CAN wires and
permit a CAN diagnostic or CAN communication. |
| Connect the Vehicle Diagnostic Tester. |
| – |
Apply the parking brake. |
| – |
In vehicles with automatic transmission, move the selector
lever to the “P” or “N” position. |
| – |
In vehicles with manual transmissions, move the shift lever
to the neutral position. |
|
|
|
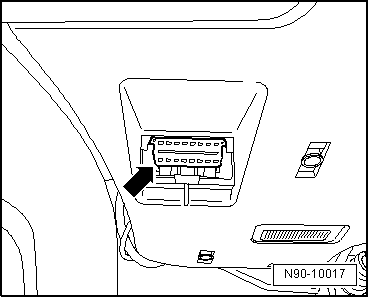
| – |
With the ignition switched off, connect the Vehicle
Diagnostic Tester with the Vehicle Diagnosis System - Diagnostic
Cable -VAS5051/6A- to the diagnostic connection
-arrow- in the vehicle.
|
| – |
Turn off all electrical consumers. |
Note
| The connection of all other and the following diagnostic
operation system or vehicle diagnosis and service system occurs
in the previously described sequence. |
|
|
|
Apply the parking brake.
–
In vehicles with automatic transmission, move the selector
lever to the “P” or “N” posi ...
Other materials:
Dimensions
Fig. 17 Dimensions
First read and observe the introductory information
and safety warnings
The data in the table apply to the most basic German model.
The specified values can vary due to different tyre and wheel sizes, if additional
equipment is fitted, for different model versions, for ret ...
Overview of the driver side
Fig. 5 Overview of the driver side
(left-hand drive vehicles)
Fig. 6 Overview of the driver side
(right-hand drive vehicles)
Key for and :
Vent
,
Lever for:
Main beam headlights
Headlight flasher
Turn signal
Parking lig ...
General Information
Perform a road test to determine if a vehicle pulls to one
side and if so, when and to which side. If the vehicle pulls to
one side. Refer to
→ Chapter „Corrective Action When Vehicle Pulls to One Side“.
If the vehicle ali ...
© 2016-2026 Copyright www.vwpolo.net


 Vehicle Diagnostic Tester, Connecting, Golf MY 1998 through 2003