Volkswagen Polo Owners Manual: Tyre pressure
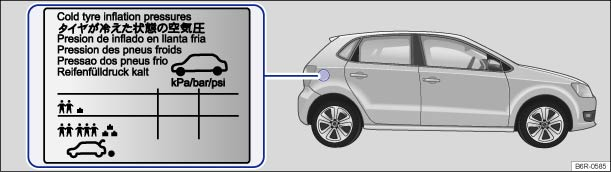
Fig. 146 On the inside of the tank flap: tyre inflation pressure label
 First read and observe the introductory information
and safety warnings
First read and observe the introductory information
and safety warningsThe correct tyre pressure for factory-fitted tyres is shown on a sticker and applies to all-season, summer and winter tyres. The sticker is located on the inside of the tank flap.
If the tyre pressure is too low or too high, the tyres will wear prematurely and the vehicle will not handle well . The correct tyre pressure is particularly important at high speeds. Incorrect tyre pressure causes premature wear and can cause a tyre burst.
The pressure should therefore be checked at least once a month and before starting a journey.
The given tyre pressure applies to cold tyres. Tyre pressure is always higher in warm tyres than it is in cold tyres.
For this reason, never reduce the pressure in warm tyres to adjust the tyre pressure. This would result in low tyre pressures that could cause the tyre to burst suddenly.
Checking tyre pressure
Only check the tyre pressure when the tyres have not been driven for more than a few kilometres at low speed in the last three hours.
- The tyre pressures should be checked regularly and only when the tyres are cold. Always check all the tyres, including the spare if fitted. The tyre pressure should be checked at more regular intervals in colder regions, but only if the vehicle has not been moved beforehand. The tyre pressure tester must function correctly.
- The tyre pressures must be altered to suit the vehicle load.
- After altering the tyre pressures, please ensure that the valve caps are screwed on and observe any information and instructions on setting the tyre monitoring system .
The spare wheel or temporary spare wheel are filled to the highest tyre pressure permissible for the vehicle.

 WARNING
- If the tyre pressure is too low, it is possible that the tyre temperature will increase to such an extent that the tread peels off and the tyre bursts.
- Fast speeds or overloading of the vehicle can cause overheating, sudden tyre damage including tyre bursts and ripping of the tread surface and thus to a loss of control of the vehicle.
- If the tyre pressure is too low or too high, the tyres will wear prematurely and the vehicle will not handle well.
- Check tyre pressures regularly, at least once a month, and before every long journey.
- All tyres must have the correct tyre pressure to suit the vehicle load.
- Never reduce excess pressure when the tyres are warm.

 NOTICE
- When attaching the tyre pressure gauge ensure that you do not position it at an angle to the valve shaft. This can damage the tyre valve.
- Missing valve caps, or valve caps that are not suitable or not screwed on properly, can cause damage to the tyre valve. Always use valve caps that comply with the factory-fitted valve cap specifications. Always screw on valve caps fully.

Under-inflated tyres can contribute to an increase in fuel consumption.

If the tyre monitoring display warns that the tyre pressure in at least one tyre is too low, check tyre pressures with a functioning tyre pressure tester. Low tyre pressure cannot be determined exclusively by looking at the tyre. This also applies to tyres with a low profile.
Please refer to the special points of the tyre monitoring system when checking tyre pressures .
 New wheels and tyres
First read and observe the introductory information
and safety warningsNew tyres
Drive particularly carefully for the first 600 km with new tyres as the
tyres have to be run in. Tyres that h ...
 Tread depth and wear indicators
Fig. 147 Tyre tread: wear indicators
First read and observe the introductory information
and safety warningsTread depth
Difficult driving situations demand the deepest possible tread depth for ...
Other materials:
Composite Wheels
Composite wheels consist of various parts.
The primary components are rims and wheel discs. These
components are fastened to each other with special screws and a
special procedure. This ensures the wheel's function, proper
seal, safety a ...
Introduction
This chapter contains information on the following subjects:
→ Handling wheels and tyres
→ Rims
→ New wheels and tyres
→ Tyre pressure
→ Tread depth and wear indicators
→ Tyre damage
→ Spare wheel or temporary spare wheel
â ...
Blender
Definition:
Blender -LLS MAX 009-
Edition 10/2008
Product Description
The Blender -LLS MAX 009- matches the overlapping areas or
the edges from the existing paint to the new ...
