Volkswagen Polo Owners Manual: Removing and installing the headlights
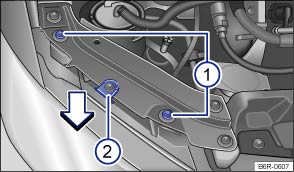
Fig. 176 In the engine compartment: securing bolts for the right headlight
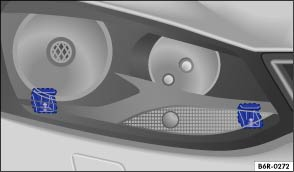
Fig. 177 Guides for installing the right headlight
 First read and observe the introductory
information and safety warnings
First read and observe the introductory
information and safety warnings
Depending on the vehicle variant, the headlight may have to be removed in order to replace the bulb.
You will need the screwdriver with the torx blade from the vehicle toolkit to remove the headlights .
Removing the headlight
- Switch off the lights and ignition.
- Open the bonnet
 .
.
- Use the torx key to remove the screws .
- Press the bottom of the headlight out of the guides in the direction of the arrow .
- Disconnect the connection on the headlight by pressing the connector towards the headlight housing and simultaneously pressing the lug on the connector to disengage. Then remove the connector from the headlight.
- Pull the headlight forwards and all the way out of the vehicle .
Installing the headlight
- Push the headlight into the vehicle until it reaches the upper stop in the middle . Make sure that the headlight fits properly into the lower guides .
- Insert the connector into the connection point on the headlight housing. You should feel it click into place.
- Screw the screws into the headlight housing.
- Push the headlight against the upper middle position and tighten the screws ① with the torx key.
- Close the bonnet and check that the headlight is positioned properly.

 NOTICE
- Please ensure that the electrical connection on the headlight housing is positioned properly in order to prevent damage to the electrical system caused by water entering the system.
- When removing and refitting the headlight, make sure that the vehicle's paintwork is not damaged.

The illustrations show the right-hand headlight. The left-hand headlight is a mirror image of the one shown.
 Checklist
Always carry out the following actions for changing a bulb in the
given order :
Park the vehicle on a firm and level
surface at a safe distance from the flow of traffic.
Apply the hand ...
 Changing bulbs in the front headlights (halogen H4)
Fig. 178 Rear view of the
right-hand H4 headlight with plastic covers: ① dipped beam and main beam, ② turn
signal and ③ side light
Fig. 179 Rear view of the
right-hand H4 headlight with ...
Other materials:
Indicator lamps
Fig. 55 In the upper section of the centre
console: indicator lamp for disabled front passenger front airbag
First read and observe the introductory information
and safety warnings
Lit up
Location
Possible cause
Solution
Instrument c ...
Two-Part Wash Primer
Definition:
Two-Part Wash Primer -LHV 043 000 A2-
Edition 10/2010
Product Description
The two-part wash primer is a zinc chromate-free,
phenol-free and acid-free two-componen ...
Refrigerant Circuit with A/C Service Station, Filling
Caution
If it is suspected that chemicals were added to the
refrigerant circuit to seal leaks, do not connect the
A/C service station and do not extract the refrigerant.
...
