Volkswagen Polo Owners Manual: Changing the bulb in the number plate light
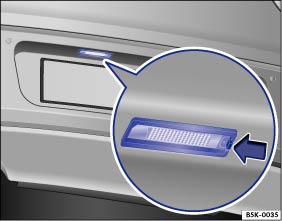
Fig. 186 In the rear bumper: number plate light
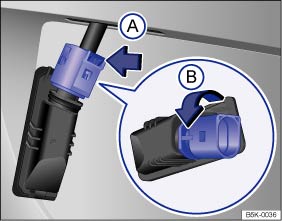
Fig. 187 Number plate light: removing the bulb holder
 First read and observe the introductory
information and safety warnings
First read and observe the introductory
information and safety warnings
A normal flat screwdriver can be used to remove the number plate light .
| The actions should only be carried out in the specified order: | |
|---|---|
| 1. | Follow the instructions on the checklist . |
| 2. | Insert a screwdriver into the recess on the number plate light in the direction of the arrow . |
| 3. | Pull the number plate light out slightly. |
| 4. | Push the catch on the connector in the direction of the arrow and pull the connector out. |
| 5. | Turn the bulb holder in the direction of the arrow and pull it out together with the bulb. |
| 6. | Replace the defective bulb with a new bulb of the same type. |
| 7. | Insert the bulb holder into the number plate light and turn it as far as it will go in the opposite direction to the arrow . |
| 8. | Connect the connector to the bulb holder. |
| 9. | Carefully put the number plate light into the opening in the body. Ensure that you put the number plate light in the right way round. |
| 10. | Push the number plate light into the bumper until it clicks into place. |

 NOTICE
 Changing the bulbs in the tail light cluster
Fig. 184 On the side of the
luggage compartment: removing the tail light cluster
Fig. 185 Tail light cluster:
removing the bulb holder
First read and observe the introductory
information and ...
 Changing bulbs in the side turn signals
Fig. 188 Removing the side turn
signal bulb
Fig. 189 Side turn signal:
changing the bulb
First read and observe the introductory
information and safety warnings
Depending on the vehicle, th ...
Other materials:
Rear view
Fig. 3 Overview of the rear of the
vehicle
Key for :
Roof aerial
High-mounted brake light
Rear window
Rear window heating
Window aerial
Rear window wiper
Volkswagen badge, used for opening the
tailgate
Tail light cluster
Number plate lights
...
Winter tyres
First read and observe the introductory information
and safety warningsIn winter road conditions, winter tyres will considerably
improve the car's handling. The design of summer tyres (width, rubber compound,
tread pattern) gives less grip on ice and snow. Volkswagen urgently recommends the
...
Beru Wheel Electronics Tire Pressure Monitoring Sensor, Removing and
Installing
Overview, Beru System
WARNING
If tire sealant was used, then the wheel electronics
on that particular wheel must be replaced.
WA ...
