Volkswagen Polo Service & Repair Manual: Restrictor
 Caution
| Non-approved tools or materials such as leak sealing
additives can cause damage or malfunctions in the
system. |
| Only use tools and materials approved by the
manufacturer. |
| The warranty is voided if non-approved tools or
materials are used. |
|
| All components of the refrigerant circuit submitted for
quality observation are always to be sealed (use original
sealing caps of original part). |
| Replace damaged or leaking components of refrigerant
circuit. Refer to
→ Chapter „Components, Replacing“. |
| To date, the original parts (compressor, reservoir,
receiver/dryer, evaporator and condenser) have been filled with
nitrogen gas. This charge is being gradually discontinued. There
is little or no pressure equalization when removing the sealing
plugs from the original part. |
|
|
|
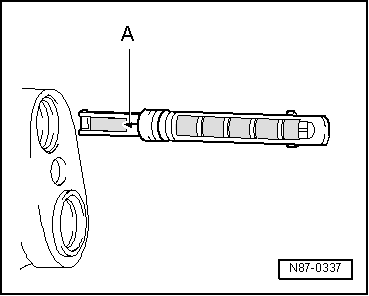
| The restrictor creates a constriction. This restriction
reduces the flow and creates high and low pressure sides in the
refrigerant circuit. Before the restrictor the refrigerant which
is under a higher pressure is warm. After the restrictor the
refrigerant which is under a low pressure is cold. Before the
restriction there is a strainer for contaminants and after the
restriction there is a strainer, to atomize the refrigerant
before it reaches the evaporator. |
 Note Note
| Arrow -A- on restrictor points
to evaporator. |
| Replace after each opening of the circuit. |
| Refer to the Parts Catalog. |
|
|
|
Caution
Non-approved tools or materials such as leak sealing
additives can cause damage or malfunctions in the
sys ...
Caution
Non-approved tools or materials such as leak sealing
additives can cause damage or malfunctions in the
sys ...
Other materials:
Washing the vehicle with a high-pressure cleaner
First read and observe the introductory information
and safety warningsFollow the instructions provided by the manufacturer when
cleaning your vehicle using a high-pressure cleaner. This applies in particular
to the pressure and the spraying distance .
Maintain sufficient distance to soft m ...
Introduction
This chapter contains information on the following subjects:
→ Preparing for a journey and driving safely
→ Driving abroad
→ Driving through water on roads
Depending on where the vehicle is used, it could be a good idea to have an engine
and transmission guard insta ...
Increasing Temperature Due To Low Tire Pressure
The diagram shows the temperature behavior of a tire at
speed of 180 km/h (111.84 mph).
A -
Normal range: when maintaining the specified tire pressure,
the temperature remains stable.
B -
...
© 2016-2026 Copyright www.vwpolo.net

 Reservoir
 Receiver/Dryer